


COSTCO 雞胸肉真的好吃….
COSTCO 雞胸肉真的好吃….

Sport Elite is a channel that focuses on track and field runners, and will regularly upload track and field-related videos. Interested runners or viewers are welcome to subscribe and share my channel.
In the 2021 “All Nippon University Women’s Ekiden”, a freshman at Takushoku University Don’t break the holy clothes After taking over the relay belt, there were six people in a row, and finally she took the third place, and the result was as eye-catching as her name. She completed 9.2 kilometers with 28 points and a pace of 3 minutes and 2 seconds. Breaking the interval record by 74 seconds!
With the release of the competition video, the 18-year-old girl became popular, and many runners were interested in her story, and today’s article will introduce the name, which is as high-profile as her running style and speed. The contestant — come without breaking the holy clothes.
 Today, the king of sports wants to introduce Japanese athletes whose names are as striking as their running style and speed – come without breaking the holy clothes
(Image Source:4years.)
Introduction
Bupo Shengyilai was born in Gunma Prefecture, Japan on March 25, 2003. He was a lively and active child when he was a child. He started swimming, basketball and other sports when he was in elementary school. It is said that he started running under the influence of his grandfather and sister. Do not break Lishu He is also a long-distance runner, with 16 minutes and 26 seconds in the last 5,000 meters.
In 2016, Bubao Shengyi participated in the “Japan Youth Olympic Cup” and won the 1500-meter championship in the Women’s Group B; in 2017, she won the “National Junior High School Cross Country” 3-kilometer championship with 9 minutes and 54 seconds! It is worth mentioning that a 14-year-old girl ran 3 kilometers in 9 minutes and 54 seconds. She was already very strong, and she ran this time on the grass with a lot of downhills and running very hard. It was really strong!
 Bupo Saint Cloth Lai has been a lively and active child since he was a child. It is said that he started running under the influence of his grandfather and sister.
(Screenshot: Sport Elite)
In October of the same year, she won the “Japan Youth Olympic Cup” 3,000-meter championship, and her 3,000-meter time reached 9 minutes and 23 seconds. Not only that, but the next year, she also represented Gunma Prefecture in the “National Metropolitan Prefecture Against Women’s Ekiden” and won the section award!
She won the 1,500 and 3,000-meter championships in the “Kanto University Land Athletic Conference” in her first year of high school, but in her second year of high school, she fell into a low ebb due to an injury to her left shinbone. The comeback can be said to be a strong comeback, and she has entered another realm!
The peak begins
The first is in December 2020, with a time of 5,000 in 15 minutes and 37 seconds, Busha Sei Lai became the first female Japanese high school student of the season! It would not be disrespectful to say that this is the time when a high school boy ran out, so this is really an amazing result.
Then in early 2021, finish the 6km event in 19:49 at the “Japan Women’s Cross Country Championships” under 20 and win! It is worth mentioning that at that time, she was not yet 18 years old. The players of this age have a lot of gaps in physical fitness every year, but she defeated a group of 18 and 19 year old players, and only She finished the race in 20 minutes alone, which shows that her strength is completely one level higher than other opponents.
 Without breaking the holy clothes, she won the 6-kilometer race in 19:49 seconds in the “Japan Women’s Cross Country Championships” under the age of 20. She was the only one in the audience to finish the race in 20 minutes.
(Screenshot: Sport Elite)
She graduated from high school in March of the same year and progressed to Takushoku University in April (Japan’s April start date). In 2017, the school’s average 10,000-meter score for men’s Yichuan players was 29 minutes and 32 seconds, which shows that the long-distance running strength is not bad.
As soon as she entered university, she won the 5000-meter championship in the “Japanese Student Land Athletics Competition” in 15 minutes and 48 seconds. After that, she ran out of one of her career masterpieces. She ran with other runners for the first 3 kilometers of the race, and passed the first 3 kilometers in 9 minutes and 23 seconds. After that, she started to speed up and put aside other opponents. The 3rd and 4th kilometers were completed in 3 minutes and 5 seconds, and the last 1 kilometer was even more Completed in 2 minutes and 58 seconds, not only breaking the conference record but also breaking the personal best!
 Just after entering Takushoku University without breaking the holy clothes, he won the 5,000-meter championship in the “Japanese Student Land Athletics Athlete Tournament” in 15 minutes and 48 seconds.
(Screenshot: Sport Elite)
If you think this is the best 5000m in the coming season without breaking the holy clothes, you are wrong! In July, she participated in a 5000-meter field race and became the third Japanese female college student and the sixth Japanese female youth in 15 minutes and 20 seconds. This result also made her successfully selected as the world youth track and field. The Japanese representative of the championship.
Then came the competition that made her popular – the 2021 “Nihon University Women’s Ekiden”. When she took over the relay belt, Takushoku University, to which Bupo Shengyilai belonged, was only ninth, but the situation began to change. She seemed to have entered another level, surpassing six people in a row, and was the Olympic marathon gold medalist Takahashi as a live broadcast commentator. Shang Zi even said that this is the birth of a star!
In the end, she completed the 9.2-kilometer interval in 28 minutes, breaking the interval record by 74 seconds, and if converted into 10,000 meters, it is close to the Japanese record of 30 minutes and 26 seconds. What is even more surprising is that she is only 18 years old. , the future is really limitless!
 In 2021, the “Nippon University Women’s Ekiden” surpassed six people in a row, and finally completed the 9.2-kilometer interval in 28 minutes, breaking the interval record of 74 seconds.
(Screenshot: Sport Elite)
different running style
Another striking feature of Unbroken Cloth is her “running posture“–Heel landing, And because the heel landing will make every step brake and slow down the running speed, thus making the running economy worse, many people are wondering why she can run so fast with the heel landing? Let me answer this question here.
Although it does look like her heels land on her heels when she moves at a high speed, it can be seen from the slow motion that she flattens the soles of her feet before landing every step, like a movement of scraping the ground, so when she lands, she has become midfoot landingIt’s not landing on the heel at all. Although landing on the midfoot does not necessarily mean that you will run faster, but it is certain that landing on the midfoot is one of the movements that can avoid sports injuries the most. Reducing injuries and making training coherent also make her progress. Reason for speed.
 The running posture of not breaking the holy clothes looks like “heel landing”, in fact, she will flatten the soles of her feet before landing every step, and when she lands, it has become “midfoot landing”
(Screenshot: Sport Elite)
Off the field, she mainly relies on cooking and playing the piano to relieve stress. She has been learning the piano since kindergarten, and usually likes to play Disney music, which may have also cultivated a sense of rhythm when running.
Summarize
One of the main reasons for the improvement in the performance of Bupo Saint Cloth actually stems from the stimulation of this summer’s “Tokyo Olympics”.Because at that time, there were many athletes around her age active on the Tokyo Olympic Games, such as the 10,000-meter 20-year-old. Guangzhong Lilijia Won the seventh place after 25 years; Nozomi Tanaka In the 1500 meters, she set the eighth place in the first Olympic 1500 meters in Japanese women’s history, and broke the Japanese record!
 This summer’s “Tokyo Olympics” brought a lot of excitement to the holy clothes, because there were many players around her age active on the court, such as Hironaka Riika (left) and Tanaka Nozomi (right)
(Screenshot: Sport Elite)
These achievements have broken the stereotype that Asian local athletes were weak in middle and long distance running in the past, which also made her realize that as long as she worked hard, she could also compete with world athletes, which gave her a lot of courage. At the same time, she also set her sights on the 2024 Paris Olympics. She not only wanted to participate, but also wanted to run well.
I also hope that she will not be injured in the four years of college, and she will be seen in the Paris Olympics three years later! I don’t know if you have any thoughts on the story of not breaking the holy clothes, you are also welcome to leave a message in the comment area below!
Ι Great full video
(Video source: Sport Elite Sports King)
Editor in charge: Joanna
[ThisarticleisreproducedwithpermissionfromSport Elite sports kingthe source of the original video: “[Character introduction]In 6 minutes, I will show you a little girl who is very popular lately – not breaking the holy clothes | Sport Elite Sports King》】
*Introduction of runners, all in sports notes

glasses warby parker warby parker near me warby parker glasses warby parker sunglasses sunglasses warby parker warby parker locations warby parker virtual try on warby parker stock
For many people, it may be difficult to buy eyeglasses online, but there is a group of people who saw the potential of online sales of eyeglasses, and through free trial and online simulation, coupled with the “ultra-affordable” positioning, broke the monopoly of industry giants and achieved a company valuation of US$1.75 billion (about 53.9 billion Taiwan dollars).
In 2010, Warby Parker’s four founders Jeffrey Raider, Andrew Hunt, Neil Blumenthal, and David Gilboa were all students at Wharton School of Business and were baffled by the expensive prescription glasses, many of which cost over $300 (about NT$9,239). Many of the glasses cost more than $300.
Nearly 200 million adults in the United States require eyeglasses or contact lenses, according to The Vision Council, with the average consumer paying $127 for their frames.
Warby Parker is an online retailer that focuses on “affordable” eyewear. A pair of vintage-style eyewear, including prescription lenses, starts at just $95. Their products can be ordered online and tried on virtually, and they have 71 locations in 28 U.S. states where you can try on, measure or pick up your glasses.

All of Warby Parker’s eyewear is designed and made in-house, which helps keep the price down and maintain quality.
They have a home try-on option where you can choose five frames to try on at home for free.
They offer free shipping. After trying on the glasses, the user can keep only the ones they like and mail them all back, with no cost to the customer for the postage included.
WarbyParker has developed a kind of high-tech – virtual try-on. Customers can input their avatar through a computer camera and put the glasses on their own image to experience the wearing effect. They can also share their images through Facebook or other social media to solicit feedback from family and friends.
For every pair of glasses sold, Warby Parker partners with a nonprofit organization to provide a pair of glasses to someone in need.
Although Warby Parker does offer a virtual fitting tool, it does require you to download the Warby Parker app and is only available for iPhone X and higher.
Their most basic glasses setup starts at $95. This is cheaper than most optometrists, but it’s not the cheapest option found online.
They do not offer major brand names. (After all, if you want to qualify for affordable/quick availability you have to offer standard specs)
Those with strong prescriptions may find that Warby Parker’s high index lenses are not of sufficient quality to meet their needs. (As mentioned above, standard specs meet the needs of the general public)

Warby Parker’s at-home optometry service, Virtual Vision Test, allows users to test their nearsightedness through a mobile app, and the results can be used to purchase glasses or contact lenses.
After downloading and installing the device, users answer a few questions, place the device about 10 feet (about 3 meters) away, and then take the vision test. A row of letters is displayed on the screen, and the user covers one eye and reads aloud the letters he or she sees.
The test results are then uploaded to Warby Parker’s server, where a doctor will review the results within two days and give the user recommendations for new glasses or another physical measurement.
There is a $15 fee for a single test, or no fee if the final result is a recommendation for physical testing or if the prescription remains unchanged.
Some optometrists are concerned that simply measuring vision through an app without regular checkups may lead to overconfidence.
For example, Jorge Cuadros, a clinical telemedicine fellow at the University of California, Berkeley School of Optometry, says that the results of the app should not be analyzed and prescribed by any anonymous ophthalmologist behind the scenes, but rather by a local ophthalmologist who is accessible to consumers.
Dave Gilboa, co-founder and CEO of Warby Parker, believes that virtual vision testing is a complement to, not a replacement for, traditional eye exams, and that the goal is not to complete a comprehensive eye exam through the app, but to focus only on the vision component.
Warby Parker offers sunglasses in a variety of styles, sizes and colors (including prescription sunglasses).
Warby Parker only offers progressive lenses, but they do not offer bifocal lenses.
Most of their frames are made of acetate, a lightweight plastic, with limited all-metal styles. (Recently more frames and designs in different materials have been introduced)
They also sell a variety of daily, monthly and bi-weekly contact lenses, including their own line of daily contact lenses called Scout. (Free samples are also available/Try Scout for free After they verify your contact lens prescription, they will send you a trial pack that includes six days’ worth of contacts.)
Warby Parker uses CentraForm technology to create disposable lenses with smooth edges and environmentally friendly packaging for shipping(The innovative, space-saving flat pack).
Don’t let your flexible spending account (FSA) or health savings account (HSA) dollars go to waste. Put ’em to good use on Warby Parker prescription glasses (including blue-light-filtering, anti-fatigue, light-responsive, and progressives lenses), prescription sunglasses, contact lenses, readers, and eye exams.
Don’t fret. Just apply for insurance reimbursement after purchasing. Apply for insurance reimbursement >
Starting at $95, including prescription lenses—plus we offer free shipping, free returns, and a six-month, no-scratch guarantee
Shop dozens of top brands (including Scout by Warby Parker) online and in stores. Whichever brand you wear, you’ll get 15% off your first order of contacts—even when paying with an FSA or HSA.
Start at $195 and come with polarized lenses at no added cost (or you can choose to get non-polarized lenses, if you prefer).
Many Warby Parker locations offer comprehensive eye exams (and prescriptions for glasses and contacts).
Warby Parker’s progressives start at $295 (i.e., way below the standard cost of progressives). These digital freeform lenses offer the widest possible field of vision compared to traditional progressives models.Our progressives start at $295 (i.e., way below the standard cost of progressives). These digital freeform lenses offer the widest possible field of vision compared to traditional progressives models.
Pixel-peeping causing eye fatigue? Our blue-light-filtering lenses may help. They filter more blue light than our standard lens options, and you can add them to any pair for $50.
Warby Parker’s combination of e-commerce, at-home optometry and AR fitting, using an innovative mix of technology to provide consumers with vision care, is still bringing changes to the eyewear industry, which is mainly a brick-and-mortar business. For the eyewear industry, physical sales are still necessary, but it remains to be seen whether e-commerce is a blue ocean market to be explored and whether consumers will buy into the new form of eyewear dispensing process.

既然如此 , 但往往要別出心裁不落入俗套 , 不被人說又是肯德基 , 又是烤鴨之類的….
你可以自己下廚 , 準備拿手好菜 , 絕對會贏得讚賞 , 那如果不想自己準備 , 哪麼怎麼準備這道菜呢?!
以下就是推薦像你我一樣很苦惱但又想來點不同的….
.jpg)
原PO買錯東西被唸1個月,老婆還放一罐葉黃素要原PO吃。(圖/翻攝自 Costco好市多 商品經驗老實說)
一名男網友表示,之前採購買錯東西,被老婆念1個月,幾天前又被交代去採購,沒想到老婆在桌上留一罐保健食品和一張紙條,讓他看完直呼「千萬別得罪女人」。
原PO在《Costco好市多 商品經驗老實說》發文指出,上次去好市多買錯東西,被老婆念超久,過了1個月都還記得,沒想到近日老婆又要他去採買,並在桌上放一瓶葉黃素和一張紙條,上面除了列購買清單,還備註「吃顆葉黃素再出門,隊友!不要再買錯了!上次10錯4」。
原PO看完無奈說「放這罐絕對是故意的,我感受的出來,是讓我補眼睛,順便長長記性」、「女人是最會記仇的生物」。
網友們看到紙條內容,紛紛笑回「字體非常的有生命力,咬牙切齒的樣子」、「這不是男女問題,10錯4耶」、「拿葉黃素不錯了,一般情況可以預期是拿菜刀啊」、「10錯4…真心不是記仇」、「10錯4!你的不良率跟我老公有得拚喔」。
也有其他人妻分享自己隊友的事蹟「叫隊友去711拿個貨還要打給我『妳後3碼幾號?』拳頭能不硬嗎?」、「這讓我想起要山藥但回來的是牛蒡,還說都是樹根」、「我家隊友是我跟他講要買什麼,他叫我用寫的寫在Line,但他抵達好市多後又打電話問我要買什麼?(掛電話加丟筆)」。
可能不只要吃葉黃素,也要吃銀杏補腦呀~~~

It has been reported that women have abnormal menstrual periods after the new crown vaccine is administered. Is this true? United Hospital found that after the administration of the new crown vaccine, the number of patients with irregular menstruation problems has increased. Some people have three months late menstruation, while others have increased menstrual flow. What is going on? Will this phenomenon return?
Ms. Liu is 42 years old. After two doses of Modena, her period did not come for three months. No special problems were found in the obstetrics and gynecology examination, so she took hormonal drugs. Worrying that she would have to take medicine all the time before her menstrual period would come, she went to the Department of Traditional Chinese Medicine of Beijing Union Medical College Renai Hospital. During the consultation, she also found that Ms. Liu was busy and stressed. This time, the problem of irregular menstruation seriously affected her mood at work, so she gave the scientific traditional Chinese medicine “Si Ni” After a month of menstruation, the amount of menstrual flow increased, and blood clots were excreted. He felt much better now. After three months of treatment, he stopped taking the medicine and his menstruation returned to normal.
Ms. Wang is 35 years old. After two doses of AZ, menstrual pain became worse, accompanied by discomfort such as heavy menstrual flow and backache. After the first dose, menstruation felt uncomfortable, but she did not mind it. After taking the second dose, the symptoms worsened, so I went to the Department of Traditional Chinese Medicine of Beijing Union Medical College Ren’ai Hospital for treatment. After the consultation, I found that the menstrual cycle had also changed. , and the traditional Chinese medicine ready-to-drink package “Jiwei Siwu Decoction” once a day, the pain and discomfort during the menstrual period were reduced, and the menstrual period returned to normal after two months of treatment, and the third dose of the vaccine is currently being administered.
Further reading:Vaccination fainting is not just fainting, it may be fatal anaphylactic shock!

Xie Xudong, an attending physician in the Department of Traditional Chinese Medicine, Ren’ai Hospital, Taipei City United Hospital, said that after the new coronary pneumonia vaccine, the number of patients with irregular menstrual problems has increased, in addition to increased menstrual pain, prolonged or shortened menstrual cycles, and more or less menstrual flow. , and some people will experience menopause. He explained,Because vaccination affects the body’s immune cells, the immune cells on the lining of the uterus are also affected, causing menstrual disordersAlthough the body’s resilience can slowly return to normal menstruation, but if it affects your daily routine, you can still seek medical assistance.
Further reading:3 preparations before vaccination + 3 dietary adjustments after vaccination can alleviate vaccine side effects!
Physician Xie Xudong pointed out that if you have pain and other discomfort symptoms when your menstruation comes, many people will have worse symptoms after taking the vaccine. Traditional Chinese medicine believes that these people are more likely to have a “deficiency syndrome” constitution, that is to say, menstruation usually does not come. People with symptoms, even if their menstruation is affected after the vaccine, will return to normal in the next one to two months, but people with deficient constitution have poor resilience, so it is common for menstrual irregularities to affect work and class, and therefore feel pressured. , making menstruation more difficult to come smoothly. In addition to “tonifying the kidney and regulating deficiency” for physical deficiency, Chinese medicine treatment will also “soothe the liver and relieve stagnation” to help smooth menstruation.
Beishi United Medical Traditional Chinese Medicine ready-to-drink package “Jiwei Siwu Decoction”, in addition to Angelica, Shudi, Chuanxiong and Baishao in Siwu Decoction, it also adds lycium barbarum, which can nourish the kidney and fill the essence. In addition to the commonly heard effect of improving eyesight, wolfberry fruit , It is also very helpful for irregular menstruation caused by deficiency syndrome. Lycium barbarum is a plant belonging to the Solanaceae family. It is well known that tomatoes of the Solanaceae family have high nutritional value. Get your menstrual cycle back to normal more quickly.
Physician Xie Xudong suggested,Menstrual discomfort due to vaccines is usually temporarybut if symptoms persistMassage the Taichong and Taixi points on the feet for 5 minutes each nightto keep Qi and blood running smoothly, if menstruation is easy to get angry and bad mood, gastrointestinal discomfort is accompanied by menstrual pain, you can drink the traditional Chinese medicine “bergamot” tea, bergamot is spicy and warm, can soothe the liver and relieve depression, warm the stomach and relieve pain, To relieve the discomfort of menstruation, put tea bags with two dollars at a time, soak them in hot water for 10 minutes, and drink, help normal menstruation, and prepare the body for the next vaccine.
Further reading:Medical treatment + types of life recipes × 9 methods to effectively relieve menstrual pain
*All articles published on this website are owned by “Baby and Mother” and other relevant copyright owners in accordance with the law. If you want to quote or reprint the content of the website, please contact our company by letter. Violators will be dealt with according to law. Contact Email: webservice@mababy.com

Moms who do not like to wash dishes, please raise your hand!
Every day to prepare ingredients for cooking is already tired enough, it is not easy to take a break to eat a meal, and after eating to face a mountain of dirty dishes, or choose not to see first, soak the dishes in water to soak, some even to the next day before washing. If you also have this habit, you should be careful, because the Japanese experts pointed out that dirty dishes if soaked for more than 10 hours, bacteria will increase to 480,000 times!
The University of Tokyo food safety research expert Mian Sekizaki pointed out that the top three bacterial food poisoning are: Bacillus, Staphylococcus aureus and Clostridium perfringens, and the dishes soaked in water after meals are actually the warmest home for these bad bacteria, Taiwan Food and Drug Administration reminded to soak dirty dishes containing food waste, oil and dirt together to accumulate, easy to let the bacteria such as Staphylococcus aureus breeding, while Professor Sekizaki also pointed out that the general after meals The tableware contains about 60 to 80 bacteria, and if soaked in water for more than 10 hours, the amount of bacteria in the water will increase to 29 million, an increase of more than 480,000 times, even by detergent and drying dishes is difficult to kill, easy to cause food poisoning at the next meal!

According to statistics, bacterial food poisoning is the biggest case of food poisoning every year, in addition to dirty dishes should be washed within an hour, and should also be dried as soon as possible after washing, after all, the humid environment is a breeding ground for bacteria, if there is no drier at home, then put the dishes in a ventilated place to drain the water and increase the air attack to speed up the drying time.
In addition, dishwashing cloths, rags, cutting boards are often in a humid state of kitchen supplies, but also likely to breed bacteria, mothers remember to regularly disinfect cleaning!

5 dishwashing tips to make dishes not greasy, more clean!
Washing sequence, water temperature are the tips, from now on no longer hate dishwashing time!
If there was a poll of the most hated household chores, dishwashing would definitely be in the top three! Many people hate washing dishes because they don’t like the greasy feeling, and many of the dishwashing detergents on the market will make your hands dry and rough after use.

Dishwashing Tip 1: Sort dishes according to greasiness
Before washing the dishes, did you throw the cups of tea, bowls of fruit and greasy plates into the sink together? This is a big no-no for dishwashing! Do not stack all the cups and bowls together when washing the dishes! This will make even cups that have only been used for tea greasy and hard to wash. Otherwise, it will turn the greasy dishes on one side into greasy dishes on both sides, and the effort to wash the dishes will be doubled.
Dish washingTip 2: cleaning order from non-greasy to greasy
After the first step to sort the dishes, then comes the cleaning order. Remember a principle not oily cups and dishes wash first. Such as tea cups, fruit plates, vegetable plates … These dishes can be washed first to avoid getting more grease and dirt that is difficult to clean, and then wash greasy dishes and pots that are more difficult to brush.
Dishwashing Tip 3: special brush wash first hot water rinse more clean
When cleaning greasy tableware, it is recommended that you can prepare a special brush for greasy dishes, brush the dishes first, and then use a vegetable cloth or brown brush to clean, so as to quickly clean the greasy dirt, rather than directly the whole lump of greasy dirt to clean, so that the tableware instead of washing more greasy! It is also recommended to use warm water when rinsing, as warm water can help carry away the grease and make the dishes cleaner!
Dishwashing Tip 4: choose the right detergent clean without hurting your hands
After understanding the correct concept of dishwashing, the most important thing is the detergent! The dishes are filled with food that we will eat, so the detergent should not be used casually. Some dishwashing detergents have an irresistible smell and even leave a residual smell on the dishes after rinsing, while others add too many chemical ingredients that make your hands dry and itchy after washing, and harmful ingredients that are invisible to the naked eye remain on the dishes, making people very uneasy.
It is recommended that you choose a dishwashing detergent with natural plant-derived essential oil ingredients, which will be fragrant and reassuring to use, or you can look for one with baking soda added.
Dishwashing Tip 5: Dry the dishes to avoid bacteria breeding
Finally the dishes are clean, but do not think that this is the end, after washing the dishes remember to hang to dry, or put in the dish dryer, do not always put in the sink. And make sure they are completely dry before putting them in the cupboard, because damp dishes can lead to bacteria growth if they are put directly into the cupboard! Especially for wooden dishes or cutting boards, you should pay special attention to them, otherwise you will have to replace them with new ones after they become moldy!
MEGA is a cloud storage service focused on security that offers users excellent end-to-end encryption and a great free plan with tons of storage. However, its history has been marked by controversy and its zero-knowledge-encryption makes collaboration difficult. Find out more about MEGA, both the good and the bad, in this full MEGA review.
Founded in 2013 as a successor to the infamous Megaupload — which you can read more about in our guide to what Megaupload is — MEGA cloud storage was created by the notorious Kim Dotcom. Following the takedown of Megaupload’s servers in Hong Kong, MEGA was incorporated in New Zealand as a cloud service dedicated to the security and privacy of its users’ data.
In spite of all its controversy, MEGA is still a very secure cloud service, and it’s one of the best choices for anyone looking for lots of free storage space. A free account will get you a whopping 20GB of cloud storage. Because of this, MEGA makes our list of the best free cloud storage services.
Although MEGA has a generous free plan, its paid plans are rather pricey and it doesn’t really offer enough cloud storage to make up for the price. There are certainly better alternatives that offer much more storage for a lower price. You can check out our review of Sync.com if you’re looking for a deal that offers top-notch security for a great price.
07/02/2021
We have updated our speed tests to reflect MEGA’s improvement in upload and download speeds as well as pricing details across all plans.
08/13/2022
Updated review with information about flaws in MEGA’s encryption process.
Despite its controversial past, MEGA is as trustworthy as any other leading cloud storage provider. It’s transparent about your privacy and even extends GDPR protection to users worldwide.
MEGA is not an illegal service and complies with all regulations that apply to a service of its type. It also has a dedicated support team to help take down any files that may be an infringement of copyright law.
MEGA does not give viruses through its software across all its platforms. However, like with any other cloud service, users should only download files sent to them from trusted sources to avoid viruses and malicious malware.
MEGA certainly outperforms Google Drive in relation to privacy and security. However, Google is a far better option for those looking for a cloud service that offers robust tools for collaboration.
Pros:
Cons:
80 % – Good
MEGA’s outstanding feature is its end-to-end encryption. All files that are uploaded to MEGA’s servers are encrypted on the side of the client, meaning the user is the only one who can decrypt their own data. Along with two-factor authentication, this makes for a very secure cloud storage service.
Apart from the excellent security, MEGA has plenty of features — some necessary, others not so much. It has several sharing features plus some nice extras, like the chat client. However, it lacks integration with third-party apps, so it’s not the best for collaboration, leaving some users turning to the likes of Google Drive and OneDrive (read our Microsoft OneDrive review).
MEGA provides a detailed overview to help you manage your storage.
MEGA is a secure cloud service that offers robust sharing features. It’s extremely useful for sharing sensitive data, with several layers of protection for your shared links. Everything uploaded to MEGA is encrypted with an individual encryption key, which can be sent separately. However, only paid users can set expiration dates and passwords for the links.
Paid users can set unique passwords and expiry dates when sharing files.
You can also share folders with anyone with a MEGA account. Sharing folders this way lets you set permissions for the folder, allowing you to choose who can upload to the shared folder, or alter any data inside it.
MEGA’s interface can be a little cluttered at times, and there’s a lot of overlap between its many features, especially when it comes to file sharing. In comparison, Tresorit is a secure cloud storage service that makes file sharing much easier and less confusing for the user. You can read more about Tresorit and its excellent sharing features in our Tresorit review, and also read our MEGA vs Tresorit comparison.
MEGA also offers a slew of apps, ranging from the standard desktop and mobile apps to live chat to dedicated apps for sharing large files.
Users can communicate via the live chat feature directly inside the MEGA web app.
The live chat functionality can be useful for collaboration, as it is also secured by MEGA’s encryption protocol. However, keep in mind that metadata, such as the email address of your contact, remains unencrypted. Chat is available both through the MEGA website and via the mobile app.
You can share files inside the chat, either directly from your computer or from your MEGA cloud drive. There are no file previews when sharing inside the chat, so you’ll need to remember the file name. It’s a tiny bugbear, but something MEGA could certainly improve on.
MEGA also retains previous versions of any file you have uploaded, so it’s safe from any accidental changes saved to the cloud. Versioning is enabled by default, and files with previous versions are marked with a little clock icon next to them.
Unfortunately, MEGA’s strong focus on privacy and security doesn’t leave much room for collaboration options, so integration with third-party apps like Google Docs is impossible. If you need to collaborate on cloud-based files, Google Drive is one of the best options for that.
MEGA allows users to preview hi-res images inside the web application.
MEGA’s file management system is fairly comprehensive, with separate tabs for recent and deleted files, incoming and outgoing shares, as well as a storage management tab where you can view statistics about your cloud storage use. You can also preview images, music and video files and PDF documents.
There’s also a feature called MEGAcmd that allows you to use a command-line interface for advanced management of your personal cloud. Using MEGAcmd and MEGA’s WebDAV integration, you can set up things like scheduled uploads or automatic backups.
|
|
|
|---|---|
| Sync Folder | |
| Block-Level Sync | |
| Selective Sync | |
| Bandwidth management | |
| Sync Any Folder | |
| File Link Sharing | |
| Link Passwords | |
| Link Expiry Dates | |
| Folder Sharing | |
| Folder Permissions | |
| Link Download Limits | |
| Upload Links | |
| File Previews | |
| Edit Files | |
| In-App Collaboration | |
| Office Online | |
| Google Docs | |
| Notes App | |
| Media Playback | |
| Mobile Apps | |
| Deleted File Retention | |
| Versioning | |
| WebDAV | |
| At-Rest Encryption | |
| In-Transit Encryption | |
| Encryption Protocol | |
| Zero Knowledge | |
| Two-Factor Authentication | |
| Server Location | EU |
| 24/7 Support | |
| Live Chat Support | |
| Telephone Support | |
| Email Support | |
| User Forum | |
| Knowledgebase | |
| Free Plan |
80 % – Good
The main draw of MEGA is its excellent free plan that comes with 20GB of storage and a generous transfer quota. Additionally, MEGA has four paid plans and a separate business plan. However, these plans are pretty costly and don’t offer any crucial features, so unless you need the larger amounts of storage they offer, there’s not much incentive to upgrade.
Pro Lite
Pro I
Pro II
Pro III
Business (3TB)
Business (10TB)
Business (10TB)
The prices above are in U.S. dollars, conversions from MEGA’s pricing in euros.
The free plan offers most of MEGA’s functionality, with exceptions such as time limits and passwords for links, longer retention periods for deleted files and the ability to grant your monthly transfer quota to other accounts.
It comes with 20GB of permanent storage, which is already among the most generous free plans. On top of that, there are several ways of expanding your storage.
Installing MEGAsync, MEGA’s desktop app, will get you 5GB of bonus storage. You can get an additional 5GB for installing the mobile app and 5GB for verifying your phone number. These bonuses, totaling 15GB, last for 365 days.
You can also nab an additional 5GB of bonus storage for each friend you invite to MEGA. Each confirmed referral gets you a bonus that lasts for a whole year, so you can easily expand your storage when you need it, at no cost to you.
Do not worry if you don’t see your bonus storage appear immediately. MEGA will send an email notification that your bonus storage is available, but may take a few days to appear on your account.
It’s worth noting that free accounts are subject to transfer limits, but the exact amount is non-specific and usually resets every 24 hours. It’s also determined by your IP address, so in the worst-case scenario you can just connect to MEGA through a VPN.
If you think a free account with MEGA is not for you, you can check out Icedrive, another privacy-minded cloud service with an excellent free plan that includes 10GB of storage.
Users can bag additional free storage spaces by downloading MEGA’s apps and referring friends.
The cheapest upgrade to your MEGA cloud storage account is the Pro Lite plan. It comes with 400GB of cloud storage and 1TB of transfer for a monthly price of $5.85 (4.99 euros). You can also choose to pay a yearly fee, which will bring your tally up to $58.59 (49.99 euros).
Next up is the Pro I plan, which costs $11.71 (9.99 euros) per month or $117.19 (99.99 euros) yearly. It offers 2TB of cloud storage and a 2TB transfer quota.
The Pro II plan comes in at $23.43 (19.99 euros) per month or $234.39 (199.99 euros) per year. This gets you 8TB of cloud storage and a monthly transfer quota of 8TB.
The most expensive plan is the Pro III plan, which costs $35.15 per month (29.99 euros), and it comes with 16TB of transfer and storage space. If you opt for a business account, you get unlimited cloud storage and transfer for the monthly price of $5.86 (5 euros) per user, with a minimum of three users.
These plans aren’t the cheapest around. pCloud is more affordable, and it’s an excellent cloud storage service overall. You can read our full pCloud review for more information.
80 % – Good
MEGA’s interface design seems a little dated by today’s standards, with its bold reds and dark contrasting grays. This does help a lot with legibility, though, making everything easy to notice and read. MEGA added a dark mode in 2021, which makes it a little easier on the eyes at night.
You can use MEGA in dark mode for better viewing in low-light situations.
MEGA offers several apps that let users access the service in different ways. There are the two desktop apps we mentioned, as well as mobile apps for Android and iOS. The browser experience is handled either through the MEGA.io (formerly MEGA.nz) website or the dedicated add-on for Google Chrome and Mozilla Firefox. MEGAcmd further expands MEGA’s feature set.
Users can sync folders and drag and drop files to their MEGA cloud storage directly from their desktop.
The browser interface is the main way of using MEGA, and it’s where you’ll find all the necessary tools. There are several tabs to the left for easy navigation, but you’ll be spending most of your time using the “cloud drive” tab. This tab has a navigator on the left side that shows your cloud drive’s folder structure, and your files are displayed on the right side of the screen.
From here you have access to all your files. You can right-click any file or folder to manage sharing links or to move, copy or delete them, plus you can download or preview them. You can use the “file upload” or “folder upload” buttons to upload data to your MEGA cloud storage, but you can also just drag and drop them into the browser window to upload.
MEGA creates a sync folder for files uploaded from your desktop.
The desktop experience is mainly handled through the MEGAsync app. Installing the app creates a MEGA folder on your computer where all your data is synced. While installing the app, you can choose whether to sync all folders or only select folders.
The MEGAsync app appears as a taskbar icon on Windows. The app functions mainly as a transfer manager that allows you to upload and download files and folders, as well as manage your synced folders. It also lets you stream files while your computer is online, functioning like a peer-to-peer service.
MEGA has an easy-to-use mobile app; however, it’s lacking some basic functionality.
One small issue with the app is that there is no “back” button, meaning that whenever you open a menu, you have to click away and then reopen the app from the taskbar. That can get annoying really fast if you have a lot of work to do in the app.
The mobile app functions just like any other mobile cloud service app. You can upload and download files, send links and move files around. Turning on “media upload” will automatically upload your photos and videos to MEGA, and MEGA’s chat feature is also accessible through the mobile app.
Since its launch, MEGA has added a ton of features, but neither the interface nor existing features have been updated accordingly. This has created some overlap between features that can leave users confused about which app to install or which sharing feature to use.
You can’t create upload links for folders, but you can turn them into MEGAdrop folders, which lets anyone with the link upload to it. However, you can’t share download links for MEGAdrop folders without them reverting to regular folders. This could have been resolved by simply allowing the user to create upload links.
All the clutter is especially visible when comparing the service to Dropbox, which has one of the most polished user experiences for a cloud storage service. You can find out more about it in our Dropbox review. It’s one of the easiest cloud services to use and is a departure from MEGA’s cluttered interface.
If you’ve had trouble using MEGA’s service, you can read our guide for a detailed look at how to use MEGA.
You can access the settings menu through the system tray (Windows) or the menu bar (macOS).
90 % – Excellent
MEGA offers a full file-sharing feature set, with only some minor things missing. There are many ways to share files and folders and even some interesting and unique features that the competition doesn’t offer.
The main way of sharing files is by sending links, which you can create with the “get link” option. Each link is encrypted, and the encryption keys can be sent separately. Plus, you can set passwords and expiration dates for links to make them more secure.
You can also use the “sharing” option to share files, but this is more useful for folders because it lets you set permissions for different users. You can set an individual recipient’s permissions to “read only,” “read and write” or “full access.” However, you can only share things with someone who has a MEGA account.
To let someone without a MEGA cloud storage account upload to your folder, you can turn that folder into a MEGAdrop folder. This will let anyone with the MEGAdrop folder’s link upload to it.
The only things missing from MEGA’s sharing functionality are setting download limits for links and restricting individual users from accessing linked files, though the encryption keys and password protection should take care of the last part well enough.
Users can share folders with both internal and external users, and set user permissions.
The MEGAsync app creates a sync folder on your hard drive, and this is where all your files are synced. You can choose which folders to sync, and you can even sync existing folders to your MEGA cloud storage account.
MEGAdrop allows external users to add to and download files from a shared folder.
Syncing folders is easy and it’s done via the desktop app’s system tray icon. You can select which folder to sync by clicking the “sync” option in the app’s dot menu, and then selecting “add sync.” You can then choose a folder from your hard drive to sync to the cloud, and choose which folder on your MEGA cloud account to sync to, or you can create a new cloud folder for it.
MEGA doesn’t offer block-level sync though, which means that an altered file will have to be reuploaded in its entirety, instead of only the parts that changed. This makes syncing data slightly slower than some competitors.
75 % – Good
In previous versions, MEGA had disappointing upload and download speeds. Thankfully, things have improved with the latest versions of the application. As with all our cloud storage tests, we uploaded a 5GB folder of mixed files using a 100 Mbps connection for both uploads and downloads.
In previous tests, it took 24 minutes to upload a 1GB folder. It’s refreshing to see MEGA has greatly improved on those performance times for uploads, especially now that we’re uploading a much larger folder. Download speeds are not necessarily anything to write home about, but they are passable.
| First attempt: | Second attempt: | Average: | |
|---|---|---|---|
| Upload | 0:08:38 | 0:08:50 | 0:08:44 |
| Download | 0:08:10 | 0:07:14 | 0:07:42 |
Is MEGA super quick? No. But its improved performance means that we can now recommend it to those who put speed toward the top of their list of cloud storage needs. However, if you’re looking for an all-round speed demon, you should consider Dropbox, which offers some of the best performance in the space (check out our full Dropbox review).
MEGA has improved its performance in terms of speed, making it a more attractive option.
95 % – Excellent
Security is what MEGA prides itself on, and it’s one of its best features. MEGA is one of only a handful of cloud storage services that provide end-to-end, zero-knowledge encryption. The best part is that it offers its encryption services at no cost at all, unlike most other storage services.
MEGA encrypts all of your data client-side, so you are the only one holding the encryption keys. This means that neither MEGA nor any malicious actor has a way to access your data without your consent. However, a significant flaw in how it handles its encryption keys may cast some doubt on this, as we’ll talk more about in the privacy section.
The encryption protocol that MEGA uses is the standard 128-bit AES encryption for your at-rest files, and it encrypts your data in transit using the TLS protocol, also with 128-bit AES. This means that your files are secure on the MEGA servers and while being uploaded or downloaded, so your data is safe from man-in-the-middle attacks.
MEGA uses two-factor authentication to add an extra layer of security for your login. This means that even someone with your account data will not be able to log in to your account and compromise your private data.
MEGA should be a safe place to store all of your private data because the client-side, end-to-end encryption ensures the privacy of your files, even if someone gains access to your data. All of this makes the MEGA cloud service very secure.
With this level of security, MEGA is unable to reset your password should you forget what it is. However, you can recover your account by downloading a recovery key. We recommend you do this and keep it safe, so you can access your account if you forget your password.
As we mentioned briefly earlier, cryptographic researchers unearthed a critical security flaw in 2022 that threatened to tarnish MEGA’s security profile. The flaw revolves around the service’s RSA encryption mechanism, and you can read more in our MEGA security flaw article.
It’s important to download your recovery key for access to your account if you lose your password.
85 % – Very Good
Privacy is where things get a little tricky with MEGA. Most users will have nothing to fear and their data should be safe with MEGA. However, MEGA’s sordid past has been mired in controversy from the day it was founded, and its relation to “pirate king” Kim Dotcom can be worrying for some.
MEGA’s servers are located in Canada, New Zealand and several European Union countries. This means that MEGA has to comply with the GDPR, a law that protects your data. MEGA further extends GDPR protections to all of its users, even those residing outside of the EU.
MEGA has spread out its server network like this to prevent a government of any single country issuing a takedown of its servers, as a precautionary measure to avoid something like what happened to its predecessor, Megaupload.
MEGA is a safe service to use. However, there are some points about user data that you should be aware of.
Its privacy policy states the service may hand over user data to advertisers, but the user will remain anonymous. That’s similar to how the likes of Google and Microsoft operate, as well as some other organizations. If you’re not overly concerned about your data potentially being handed over to third-parties then this won’t be an issue.
MEGA never has full access to your data, owing to its client-side encryption. Plus, even if MEGA was forced by law to hand over your data, it is all encrypted by its zero-knowledge service.
However, MEGA does hold onto some metadata about your MEGA usage, including:
This data doesn’t amount to much, but it’s enough to discern whether a user is breaking MEGA’s terms of service or any copyright laws.
Unfortunately, MEGA’s claims of being zero-knowledge hit a snag when cryptographic researchers discovered serious flaws baked into the service’s encryption model.
You can check out the full story for all the details, but the short of it is that barring a complete top-to-bottom overhaul of its encryption process, there remains a chance that an inside actor in control of MEGA’s infrastructure could gain access to users’ encryption keys, thus gaining the ability to decrypt their data.
That said, the attack requires effort from MEGA, so we don’t think it’s particularly likely to happen, and we still feel confident recommending MEGA as a secure and private cloud storage service. Still, the discovery of the flaw is worrying, and it knocks some points off of MEGA’s score in this category.
MEGA.nz was founded by Kim Dotcom in 2013. Since leaving the company in 2015, he has made claims that MEGA has been taken over by a Chinese investor, William Yan, who is wanted in China for fraud. Whether this is accurate has yet to be determined, but it’s something to be aware of, as some may not wish to use a service that’s covered with controversy.
It’s also important to note that a large portion of MEGA’s shareholders are influenced by or connected to the Chinese government. China is notorious for its lack of interest in protecting people’s privacy. Again, no wrongdoing has been confirmed, but it’s worth having these concerns on your radar.
Luckily, all of your files are encrypted, so not even MEGA can actually access your sensitive data. This means you should have no worries about China’s president looking at your cat pictures.
75 % – Good
MEGA is somewhat lacking in the customer service department. It has a help center for frequently asked questions, but if you can’t find an answer there, you can contact customer support via email.
You can use the help center to find answers to most questions, which are neatly categorized into sections about the various apps and services and further divided into topics. The help center is fairly comprehensive, and there are image guides for most articles there.
MEGA’s customer support is limited. However, it does have an extensive help center that covers most issues.
The only way to actually contact a customer service representative is through email. Though MEGA offers 24/7 email support, response times can vary. It claims to respond within 24 hours, but a whole day of waiting may be too much for some users. We received a response within six hours of sending our test query.
Also missing from its customer support service are phone support and a forum where users can discuss issues among themselves, and live chat would be a welcome addition. MEGA could learn a thing or two from Google Drive, which has a wealth of customer support options available at all times.
Despite all the drama surrounding it, MEGA remains a solid cloud storage service. With its strong dedication to privacy and security, it is one of the safest cloud services around. Plus, all of its security features are available for free, so you don’t have to pay extra for its encryption services.
MEGA’s free plan is very generous, with an upgradeable 20GB of storage, making it one of the best free cloud services. It lacks only some minor features, and its ample storage is enough to satisfy most users’ needs.
However, if you need more storage than the free plan offers, MEGA’s prices can be prohibitive. You may be better off with a service like Sync.com, which offers much of MEGA’s functionality at a lower price and without the attached controversy.
What are your thoughts on MEGA? Is the drama enough to scare you away, or is all that free encrypted storage just too good to pass up? Let us know in the comments below. Thank you for reading our full MEGA review.

這次測試的韓國霜淇淋粉(口味)有4種(草莓,哈密瓜,香草,巧克力)
由代理商恆藝貿易有限公司進口….
測試後,以草莓口味和哈密瓜口味最多人喜歡
香草口味,好吃,但因為每一家的味道會有差異而且香草口味很大眾,主要是在甜味和牛奶味濃郁,喜好度因人而異
巧克力口味,也不錯,不會太甜,但巧克力(可可味)不夠濃郁,適合不想要太甜的人和加料時當基底使用
我們發現霜淇淋粉(口味),大部分人比較偏愛不要太甜的,而針對那部分的味道需要濃郁一點
但味道不太甜,適用紙杯裝,味道稍微甜一點,則適合用甜筒餅皮裝
所以若要販售,以特殊口味(排除香草/牛奶)會較受青睞唷~~~


以少油少鹽、不過度烹調為原則,天然健康為主要訴求,結合養生輕食烹調高品質餐點。
天天為你直送美味餐點,不用再每天煩惱晚餐要吃什麼,一切都由甜栗幫你準備到好
(圖文皆取自FB官網)
甜栗健康膳食
粉絲團:甜栗餐盒Tien Li
官方網站:https://www.tianlie.com.tw/
訂購須知:https://www.tianlie.com.tw/delivery-ordernotice.html
地址:台南市東區富農街一段129號
電話:2675522 0907-211-068
LINE ID:@653gcges


![]() 烹飪油煙大解密
烹飪油煙大解密![]() 食物烹飪的方式有千百種,到底哪種更好呢?我們的專業廚師擁有20年豐富經驗飲食,以少油少鹽、不過度烹調為原則,天然健康為要求訴求,結合養生輕食烹調高品質餐點。
食物烹飪的方式有千百種,到底哪種更好呢?我們的專業廚師擁有20年豐富經驗飲食,以少油少鹽、不過度烹調為原則,天然健康為要求訴求,結合養生輕食烹調高品質餐點。

#團購餐盒 #宅配晚餐 #四菜一湯 師傅的職人精神+總鋪師的鹹香下飯菜,蹦出中西菜色多變的便當美味。 用心料理的好吃便當,低卡減脂無負擔, 今晚你想來點什麼呢….就讓甜栗的溫暖宅配晚餐填飽你

You often use the video player to watchMovieOr funny videos? If so then you must be on Windows working systemThe built-in Windows Media Player has a lot of dissatisfaction, because it has too few functions, and many file formats are not supported.
This article will introduce the 12 best playback software, so that you can watch videos comfortably through them, and enjoy the visual shock brought by audio and video.
Generally speaking, a qualified video player needs to be able to open at least WMV,AVI,MP4,MKV,3GP,M4VTS, MPG,FLV,MOV and RMVB format.
A useful media player needs to support playing video files and sound files at the same time, and provide functions such as managing video files, adding and deleting subtitles, adjusting picture and sound settings, etc.
Windows and Mac The built-in video player does not provide comprehensive functions, which also causes users to download and install third-party software to make up for the lack of functions.

VideoSolo Blu-ray Player is a video playback software that supports Blu-ray, DVD, and 4K high-definition video. It can read Blu-ray discs quickly and run with lower CPU usage, allowing you to enjoy on Windows 11. Smooth video screen.
It supports all common video file formats, including MP4, MKV, MPG, TS, WebM, VOB, MOV, etc., so you can hardly find unplayable video files.
Overall, VideoSolo Blu-ray Player has all the video playback functions you need, and the operation interface can be used quickly. It can be said to be a very good choice for video players.

VLC Media Player is a player developed by VideoLAN that supports opening a variety of music and video formats, whether it is FLV, MP4,MKV,MP3 or MPEG-3 There is no problem with other formats, and there is no need to download and install any codecs.
Off topic, if you are looking for a good music player, you can refer toThis article.
it executesFast and easy to use, even first-time users can get started quickly.AlsoyesFree open source playback software for Windows, Mac,LinuxAndroid and iOS working system.
In addition, it has different customization options that can help you improve your movie viewing experience and change the appearance of the player.And after installing the plug-in, you canGrab videos from streaming platforms (Youtube)to play.

GOM Player(Gretech Online Movie Player) is an easy-to-use video player that supports the most common music and video formats, such as AVIMKV, MP4, FLV and MOV, etc.In addition, it can play high-definition movies, 4K, 8K or 360-degree movies can be played normally.
In addition to the basic functions of all video players, GOM Player also has other advanced functions, such as AB segment repeat playback, speed control, music and video effect adjustment, screen capture, etc. It also allows you to change the appearance and operation interface.

PotPlayer is a video player developed by the Korean company Kakao,It has a variety of customization options to choose from, allowing you to create your own personalized video player.
Using technologies such as CUDA, QuickSync and DXVA, PotPlayer provides good playback performance and a lightweight and fast experience.
Compared with VLC Media Player, PotPlayer supports more video and music file types, and the common formats such as MP4, FLV, AVI and MKV are no problem.
thisThe player can also play 3D videos and supports various types of 3D glasses. At the same time, it has many built-in keyboard shortcuts, so it is faster and more time-saving to operate.

Media Player Classic is a classic video and audio playback software. After the development of Media Player Classic was suspended, the Home Cinema version became the best choice for users.
Their developers fixed some issues with older versions and developed faster and lighter players.Just like the other free streaming software on this recommended list, Media Player Classic will not disappoint.

Plex makes it easy to play large video files, including movies, TV shows, movies, and more. It can also organize and manage the audio and video files in the computer,With its easy-to-share feature, you can even choose to share the file publicly, and your family can also watch it.
Another feature of Plex is that it offers freestreaming mediaservice through which you can watch free movies and TV shows.In addition, the player can also open almost all video file types, and thanks to Chromecast support, it allows you to cast videos to larger screens.
You can also install the Plex app on your phone or tablet, and use the app as a remote to control video playback or pause.

KMPlayer is an excellent free-to-play software that was first released in 2002 and acquired by Korean media company Pandora TV in 2007.
It has the ability to play all major music and video files, if you need to open more video frames through it,Additional external decoders can be installed to expand, and it also supports high-quality formats such as 3D and 4K.
It can also repeat parts of the movie and edit the movie’s subtitles directly in the player.

ACG Player is lightweight and compact, and provides basic player functions, such as music and video effect adjustment, subtitle display, background music, and more.In addition, it has built-in audio and video codecs, so it can open most video files, of courseIt also supports externalhard driveand disc playback files.

DivX Player, a video player software that has been around for 20 years, can play popular video formats such as MP4, MKV, DivX and AVI very smoothly.You can also use it to enjoy 4K high-definition video.
It can also be used as a multimedia player, whether it is music, videos and photos can be displayed normally.Plus, the DivX player has advanced features like Trick Play that let you easily jump to your favorite clips. There is also the Chapter Points function, which allows you to simply play different scenes.
In addition, DivX canSync with Google Drive and Dropboxallowing you to grab files directly from the cloud space for playback.

Kodi (formerly XBMC) is another free and open source AV player that is highly customizable and offers media center-like functionality.
It supports most common audio and video file formats and was originally developed independently by Kodi, known as Xbox Media Center, for the first generation of Xbox consoles.
In addition, the player also has a lot of expansion plug-ins that you can use, you can browse Netflix,YouTubeHulu, and Veoh.

5K Player is a customized player for users who like to experience ultra-high-definition movies or TV shows. It supports playback of UHD, 4k and 360-degree videos.The tool also has the dual power of AirPlay and DLNA, which allows you to stream music and movies wirelessly.
The user interface of 5KPlayer is very simple, it is famous for supporting multiple online streaming media platforms, allowing you to download from YouTube,FacebookVimo, and MTV to import videos and music.

MediaMonkey helps you organize and manage large catalogs of music and video archives, and is also a pretty decent media player, allowing you to sort archives by title, artist, or band.
It can synchronize the software song library with Android and iOS devices, supportAll common video and sound formats, if you need to file conversion it can do it too.
The above is the introduction of the best video playback software. If you need a free and practical player, then VLC Media Player will be recommended. Of course, other software also have their own advantages. You can choose to use it for your own reference.

Last updated: February 15, 2022
Under the impact of the epidemic, many Pokémon players have begun to use third-party tools to make their way of catching treasures smoother in order to make the process of catching treasures smoother, including the well-known trapeze program iSpoofer for POGO. It allows you to easily catch treasures at home.
The operation of iSpoofer is easy and simple, so it is loved by everyone, but in most unreasonable cases, Pokémon officials have also started a large-scale inventory and blocking of illegal accounts, and recently, many players have found that iSpoofer has begun to be unable to install. situation.
But this article will still teach you how to download iSpoofer and how to install it. If you can’t install it, you will also recommend Tenorshare iAnyGo, which is also a trapeze program, but with simpler performance, security and interface than iSpoofer.
![[The strongest iSpoofer teaching in 2021]Pokemon GO trapeze teaching, plug-in modification GPS positioning](https://i0.wp.com/www.johntool.com/wp-content/uploads/2021/06/ispoofer-pokemon.jpg?resize=768%2C500&is-pending-load=1#038;quality=100&strip=all&ssl=1)
![[The strongest iSpoofer teaching in 2021]Pokemon GO trapeze teaching, plug-in modification GPS positioning](https://i0.wp.com/www.johntool.com/wp-content/uploads/2021/06/ispoofer-pokemon.jpg?resize=768%2C500&quality=100&strip=all&ssl=1)
Although the iSpoofer website has been temporarily closed, Azhang will still provide you with the iSpoofer for POGO installation link, official website and mobile version webpage.
Whether the iSpoofer website can resume normal use is still difficult to infer, but it is not difficult to see that the website is temporarily closed due to the strict control of Pokémon officials. As for whether it can resume normal use, it is still uncertain. The possibility of permanent shutdown is ruled out.
If you can't officially download iSpoofer, don't worry, here we also find an alternative tool Tenorshare iAnyGo, which is also a trapeze program, so that you can still enjoy the fun of catching treasure.
The following teaches you how to install through iFunbox iSpoofer for POGO Provide the IPA file to your device.
First, get a computer and a cable that can connect to your iPhone or iPad, and uninstall Pokémon GO from the device.
step 1
Click the link below and download the official iSpoofer IPA file to your computer.
step 2
Since iFunbox's interface is simple and straightforward, download a tool that can install an IPA file to an iOS device.


step 3
Start to execute the software, click "Installer" at the top of the screen, then place the IPA file downloaded in Step 1 under the specified path, and finally follow the prompts of the system software to complete the installation.


After reading the above introduction, if you still cannot download iSpoofer for POGO, it is better to try the alternative tool directly Tenorshare iAnyGo Bar!
First of all, let's briefly introduce the six advantages of iAnyGo that can perfectly replace iSpoofer:
More details can be found at:
Tenorshare iAnyGo currently provides a free trial version. If you feel that it is suitable and liked after the experience, you can directly go to the official website of Tenorshare iAnyGo to purchase.
There are versions for Mac and Windows, and the paid part also provides three options for players to choose from, namely one-month, three-month, and permanent licenses.
After installing Tenorshare iAnyGo, you can see the three modes iAnyGo provides for different needs through the interface below, namely "positioning modification", "single-point movement" and "multi-point movement".
You can connect the mobile device to the computer through a transmission cable, click the left column to select the mode you want, and then click "Enter" to use the positioning modification function.


Click on the destination you want to reach through the map, or directly enter the address or GPS coordinates, and then click "Start Modify", the program will directly modify your device location. The following also includes options for speed and number of moves, which can be adjusted to the desired mode according to your own needs.
Remarks: You need to pay attention to this first. In order to prevent the account from being officially blocked by Pokémon due to the change of the location of the big action, you need to close the background program of the Pokémon APP before enabling this function. All applications with positioning function connected to the device through the transmission line will also change their positions. If you need to view the original positioning, click "Return" in the lower left corner, and you can see the location you have used in the history record.


Simply put, it is a point-to-point movement. You can set the start and end positions by yourself. Through iAnyGo, you can carry out an anthropomorphic simulation movement process.
First, click the second option "Single Point Move" from the left side of the main screen and click to enter.
Next, enter the location of the starting point and ending point. What is special here is that he provides three different simulated movement methods, namely walking, cycling and driving. The speed of movement can also be entered. We can also see the time and distance through the interface below. If you encounter a place where you want to catch treasure during the movement, you can click "Pause" or "Stop" immediately, and you can grab treasure anytime, anywhere.


If you want to arrange a complex movement route in the process of using, the "multi-point movement" mode is definitely your best choice. But it should be noted that iAnyGo in the "multi-point movement" mode does not judge by itself the routes that can actually be walked and passed in real life, such as rivers, mountains, rice fields...etc. Players who want to use this mode should pay attention to use general roads as much as possible when setting up their movement routes.
First, as in the previous two modes, click the third "Multi-point move" below from the left side of the main screen, and then click "Enter".
Then, in addition to setting the starting point and ending point you want to go, you can also add more stops between the points, and you can complete a variety of different road sections just by setting it once.
This mode not only allows you to simulate the movement process more realistically, but also allows you to plan a more detailed route.


If this tutorial doesn't work, here's a Pokémon GO trapeze tutorial video for your reference.
The following picture shows the various plans and prices of Tenorshare iAnyGo, divided into three ways: one month, one season, one year, the longer the time, the more cost-effective.
At present, each mode provides two free trials. After the trial, friends who like it can make purchases according to their own needs.
No matter which plan you buy, as long as the device is bound with a serial number, you can connect to one computer and five devices, isn't it a good deal?
Here is also a 30% discount code for everyone, don't miss it if you like it!
30% discount code: A3KER6


Although iSpoofer cannot be downloaded at present, Azhang also helps you find a very good alternative Tenorshare iAnyGo.
Not only the interface is simple to operate, but also very user-friendly, you can plan the route you need, and you can fly to all parts of the world through iAnyGo without jailbreaking. I hope this article can make you still enjoy it if you can't go out to catch treasure during the epidemic.
Support A Zhang's new book "Open the Internet and make money", which shares a lot of knowledge about self-media and investment and financial management, which is very suitable for Internet entrepreneurs and office workers who want to increase additional income to read.


If you are interested in currency circle information, you can subscribe to this newsletter:The latest information in the currency circle
I currently have the largest self-media Discord community in Asia:Crypto Mind
Push the products that Azhang loves very much, welcome to join the group buying group:Azhang Goods Group Buy LINE Community
12 articles that teach you step by step how to start making money with your blog:Master's Road
I made the first pot of gold in my life through affiliate marketing:What is Affiliate Marketing?I made millions from affiliate marketing in 11 months
Easy way to invest in US stocks:[US stock ETF]Make 45 K? Yale Chen US Stocks Course Evaluation
More related community links:Tool Wang Azhang Community List
Some links on this site have cooperative relations with merchants. For purchases made through my links, I will receive a small commission so that I can continue to operate the site, but it will not affect any of your rights and interests. For details, seeDisclaimer.
If my article is helpful to you, welcomesponsor me a cup of coffee


For article citations, please write to request authorization, otherwise the right of legal recourse will be reserved.
by Johntool-Tool Wang Azhang
504
Gateway Time-out
Error Times: Thu, 26 May 2022 01:40:38 GMT
IP: 160.153.153.31Node information: PShlamstdAMS1wt94:12
URL: https://www.81857.net/soft/15148.html
Please contact our support:
Check: Details
ERROR
The requested URL could not be retrieved
While trying to retrieve the URL:
https://www.81857.net/soft/15148.html
The system returned:
(110) Connection timed out
The remote host or network may be down. Please try the request again.


If you want to watch foreign movies and albums, in addition to Netflix, the second most people use is “Hulu‘
Hulu has content from over 90 vendorsincluding “Disney”, “NBC”, “Sony Pictures Television”, “Warner Bros.”, etc., there are many movies that can only be seen on Hulu
In addition to foreign movies, Hulu Japan (Hulu.jp) also has many more than 70,000 movies, and also offers a two-week free trial
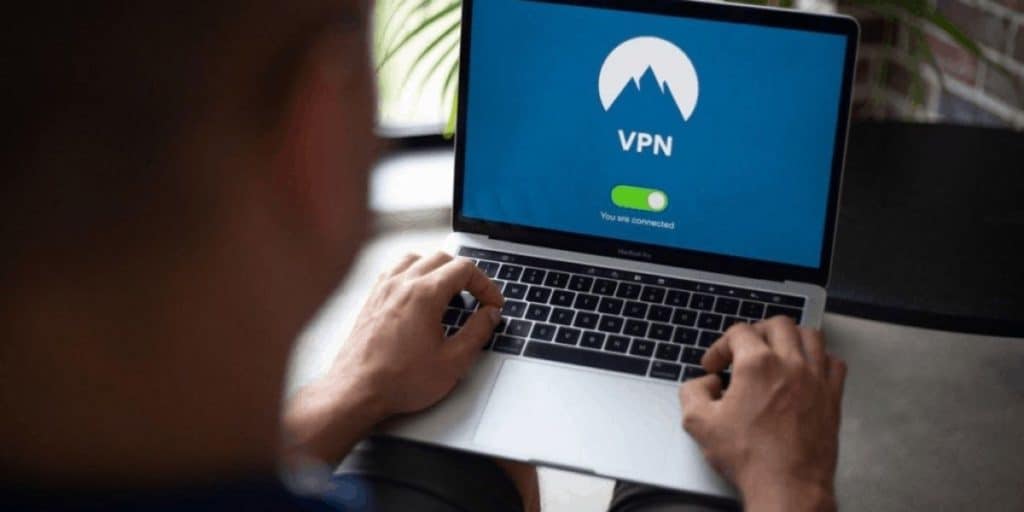
It’s a pity that, due to copyright, it is still not possible to watch Hulu in Taiwan for the time being. There is only other way to use Hulu in Taiwan, that is VPN.

I believe that many people are not very clear about what a VPN is. Another common term is “circumvention software”, which can lift regional restrictions through the IP address provided by the VPN company.
For example, Hulu cannot be used in Taiwan, but through the US server provided by the VPN company, Hulu will think that we are using it from the United States after connecting, so it can be used normally.
The use of VPN is also quite extensive, and it can even help you book air tickets, restaurants at a lower price
If you want to know more about what a VPN is, you can read this:【What is a VPN】 VPN uses
Here we take Hulu Japan as an example. Under normal circumstances, enter the registered member page of the official website of Hulu Japan, and the display is as shown above.
Then we connect to Japan through a VPN, here is the VPN Surfshark
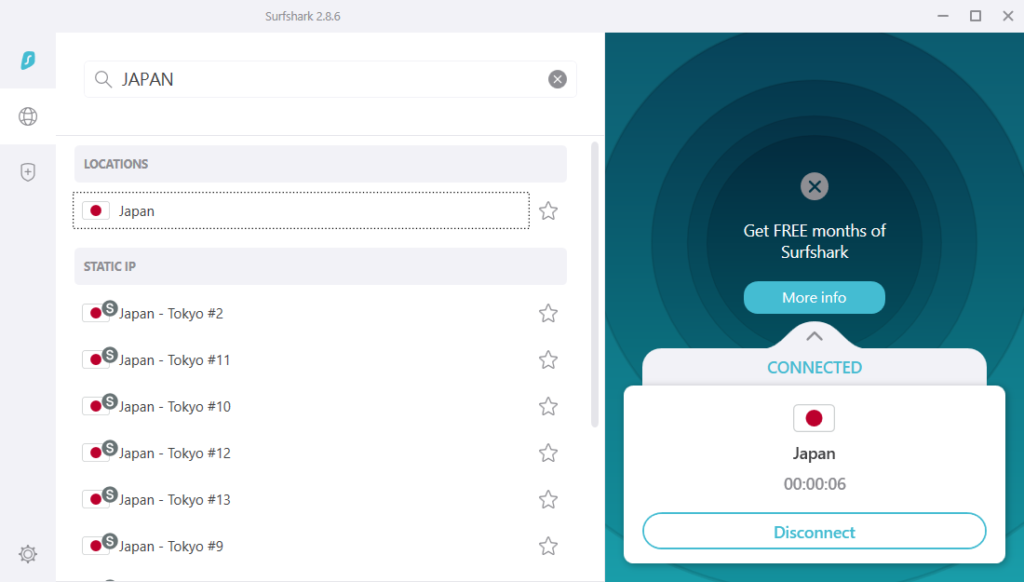
After reopening the page, you can go to the registration page
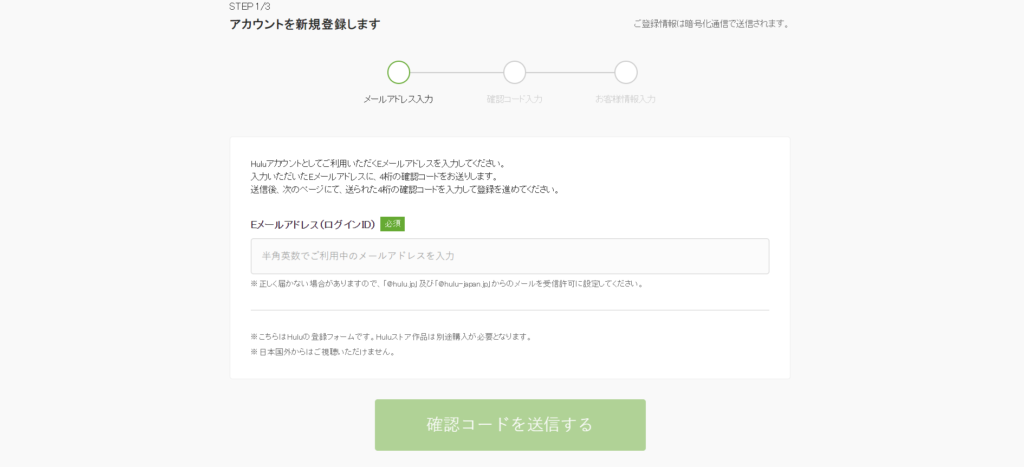
Follow the prompts to complete Hulu Japan membership registration
Of course Hulu also knows that there will be people connecting this way, so not all VPNs can help us watch Hulu in Taiwan
We picked the 10 most recommended VPNs to connect to US and Japan servers to watch Hulu, and only 3 of them are successful and smooth for watching videos
They are: Surfshark, NordVPN, ExpressVPN
Below we also briefly introduce them
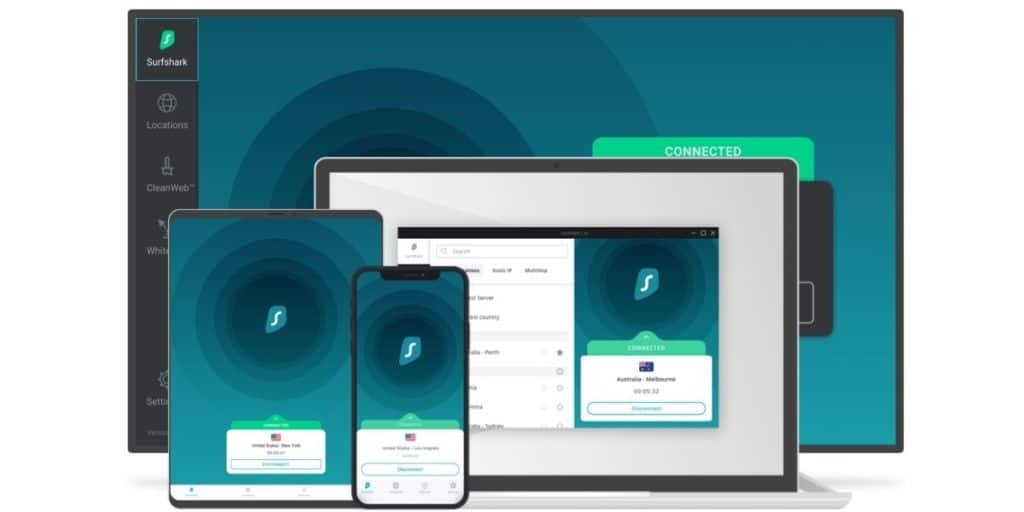
The biggest advantage of Surfshark is thatOnly need to apply for one set of accounts, unlimited number of devices can be usedwhich can be used by the whole family
In addition to cracking Hulu, it can also crack other video streaming platforms such as Netflix, Amazon prime, etc. Surfshark’s APP is also designed to be very easy to use.
At the same time it is alsolowest price VPNthe connection speed to Japan is also quite stable, so we quite recommend using it
Loses Surfshark a bit on price, but NordVPN has itThe most servers in the worldYou can choose, and therefore the quality of the connection is more stable
The number of devices can only be used in 6 devices, which is enough for personal use. It is more difficult to share the cost of joint purchase.
Even so, due to the large number of server advantages, it is still rated as a Top 5 VPN in foreign media, which means it is still a good choice.

ExpressVPN is one of the top VPNs in the worldthe number of compatible devices is terrifying, and every imaginable smart TV and game console can use it
Servers are also located in 94 countries around the world, far ahead of other VPN providers. With military-grade encryption and high-speed Internet connections, it is worthy of being the VPN with the highest quality.
But high quality comes from high cost,High costs are also reflected in the pricethe monthly cost is higher than Surfshark and NordVPN, of course, if you have enough budget, you can also choose the highest quality VPN to enjoy
There are many VPN providers on the Internet that provide free VPNs, but there is no such thing as a free lunch. Although it can be used for free, it actually still has to pay a little “price”.
Generally, the most common are pop-up advertisements, which are mostly acceptable. The other is to collect users’ personal information and browsing records, and sell them to third-party advertising companies in exchange for profits.
If that’s all ok, there’s bad news for you
That isFree VPNs Won’t Help Us Watch Hulu From TaiwanBecause the number of servers provided by free VPNs is small and the IP addresses are fixed, streaming platforms such as Netflix and Hulu all record these IPs as blacklists
To learn more about the risks of free VPNs, read this:【VPN Security】What are the potential risks of free VPNs?
Hulu will not be listed in Taiwan for the time being, but it doesn’t matter. Through VPN, we can easily connect to Hulu in the United States or Japan in Taiwan to enjoy the latest movies and original albums.
If you are still hesitant to choose which VPN to choose, you can try our most recommended “Surfshark” first. It has a high CP value and a 30-day trial period. If you are not satisfied, you can get a full refund.
More related articles
【Paid VPN Recommendations】7 Best Paid VPNs
[Surfshark VPN Review]VPN with the highest CP value
as many of you like the AMA on PBNs and the 301 guide.
Let’s throw another guide onto the forums.
Grab some coffee. This is gonna be a bit longer.
Glossary
What is a PBN and why is everyone raving about them?
First let’s start with a basic definition: What exactly is a PBN?
PBN is short for “Private Blog Network“
And as the name suggests, it’s basically a network of expired domains with strong link profiles and clean histories that you leverage to funnel link equity to your money site. If it’s done right, the PBN should help improve your rankings over time.
Why does that work?
Well, as most of you already know, Google uses links as one of their key ranking factors.
It all started with a little algorithm called PageRank.
PageRank was used to determine the value of a site by looking at what other sites were linking to it. It was scored logarithmically on a range from 0 to 10. With 10 being the highest.
You can still read about it in the original paper (Link)
Pagerank eventually evolved to become the GOLDEN METRIC to determine the value of a backlink for years, up until Google discontinued the public display of it in 2016.
However, Google still uses PageRank internally:
The key takeaway here is that Google still uses links as one of their KEY ranking signals.
And while the search algorithm today is much more complex and advanced, links remain as important as ever.
There’s actually a really great study done by Perficient (Link) that shows the correlation between links and respective rankings in the SERPs in 2018 and 2019 (so rather recent).
Their results show that links still play a key part in ranking higher in the SERPs.
Cool story, bro. We already knew ALL that.
Okay, dude, chill your nuggets. I’ll explain why it’s important stoll good to know.
So, we’ve learned that Google loves links. But not just any type of link. You can’t just load up the ol’ xRumer and send a few hundreds thousands forum posts to your site. Those days are gone (sadly).
These days Google heavily favors CONTEXTUAL links.
By contextual I mean in-content links from sites with great link profiles and superb metrics. These can be guest posts, editorials, link insertions and, you guess it, PBNs!
Just imagine having a small PBN of powerhouse domains that only YOU control. You say what goes where.
Sounds pretty awesome, right? It is.
Here’s just a small glance at one of our low-key PBNs:
.png")
Don’t you think owning a small network like this would be a huge asset for your overall SEO success?
Even for smaller niches with low-mid competitive keywords.
Yep, we think so too.
That’s why we love PBNs and use them for almost all of our own sites.
However, building, running and especically scaling a PBN comes with certain risks.
RISKS OF A PBN
As you may know, Google is highly AGAINST any type of active link building. According to their guidelines:
“Any links intended to manipulate PageRank or a site’s ranking in Google search results may be considered part of a link scheme and a violation of Google’s Webmaster Guidelines.”
So, by definition, any type of link building you do is against their guidelines.
But fuck it, this is Blackhatworld, not Webmastercentral.
We love building links. We always have.
We just need to be extra cautious these days. Especially since we don’t know what Google is planning for future algo updates.
The fact is that links stillö work. They work SOOOOO f*king well, that all the big players out there use PBNs to rank their sites.
However, building a PBN is not a simply task.
You can’t just buy a random domain, host it wherever, slap on a free theme and link to all your site. Nuh-uh. Big no no.
By doing that, you will leave a lot of so-called digital ‘footprints’ in the proverbial sand that Google can find. If they do, you will end up in the ‘penalty zone’ sooner than later.
For those of you that were already here in 2012-2014, you’ll probably remember the big blog networks like ALN or BMR?
Incredibly powerful networks that worked like a treat. Sites were ranking left and right and it was beautiful.
However it was not long until Google found all their PBNs and penalized the whole network including the sites that bought links on it.
It sucked. BIG time.

Source: Archive.org
So, in order to keep your PBN safe, you need to avoid these dreaded ‘footprints’ at all costs.
In addition to those risks, a PBN can become quite expensive. I’ll just quote myself here.
And that’s just a bare minimum.
For really good domains, i’d ballpark it somewhere between $500 and $2000 per site.
Yep, PBNs are not cheap. But with high risks come high rewards.
So for those of you who are not scared to spend money to make money, read on.
WHERE TO FIND PBN DOMAINS?
Okay, so we now know that PBNs work excpetionally well to help your rankings.
We also learned that PBNs are only as good as the domains that it is built on.
So where do you find these golden nugget domains with incredible metrics, link profiles and age?
Well, there are basically two options you have: Buy them from a vendor or find them yourself.
DOMAIN VENDORS
Many of your probably don’t have the time, expertise or patience to sift through hundreds and thousands of expiring domains every day.
The good news is that there are domain vendors, that did all the groundwork for you. They went through the abundance of garbage domains out there, bid at auctions, hassled with site sellers and scraped until their di*ks fell off.
That’s a lot of work. So, clearly, you have to pay a pretty penny for these domains.
Having said that, if it saves you valuable time, it’s a no brainer. Most of the domains offered by vendors all have great DR and RD with a balanced link and anchor profile.
There are several good domain vendors here on BHW, that you can try out. I don’t want to give any recommendations.
FINDING THEM YOURSELF
If you don’t want to use a vendor, you have to find your PBN domains yourself.
We recommend to use
for that.
It’s completely free to use and integrates with the biggest domain marketplaces.
There are several stages that an expiring domain goes through. And, technically speaking, a domain can be snatched up during different times of that expiration process.
Stages of an expiring domain
Renewal Grace Period – the domain owner still has a few days to renewe their domain. During this time there is no way to bid or buy the domain in question.
Domain Auction Period – if the domain owner decides not to renew the domain, the domain moves into the auction phase. Here you can bid on the domain name and the highest bidder usually get the domain. This is one of the best times to snap up a really good PBN domain, but know that you won’t be the only one bidding for the domains. GoDaddy, in particular, has a HUGE auction marketplace, where hundreds and thousands of bid are added every day.
You can check them here (for Godaddy): https://member.expireddomains.net/domains/godaddyexpired/?o=bids&r=d#listing
Clouseout Period – if the domain is not successfully sold at auction, it will become a ‘clouseout domain’. These can be purchased for a fixed price and are available for a few days. There are quite a few gold nuggets in here that people overlooked at auctions, so you may get lucky.
You can browse through them here (for GoDaddy): https://member.expireddomains.net/domains/godaddycloseouts/ (GoDaddy)
Pending Deletion Period – if the domain has not been sold at clouseout, it will move into the ‘pending deletion stage’. After that it will become available to the public for everyone to register.
At this point it would make sense to use a backorder / dropcatch service to register the domain once it drops to make sure that you get it before anyone else does.
Good dropcatch providers are SnapNames.com, Dropcatch.com or Nicsell.com
You can browse through all pending delete domains here: https://member.expireddomains.net/domains/pendingdelete/ or https://member.expireddomains.net/domains/dropcatchauctions/
Deleted Domains – if no one dropcatched the domain or no backorders have been placed, the domain will become available to everyone again.
There are literally millions of domains available in this stage and most of them are utter garbage. But who knows, maybe a domain vendor overlooked a nice domain. If youre lucky, you still may find a domain that you can use (but don’t expect too much)
You can browse through them here: https://member.expireddomains.net/domains/combinedexpired/
PBN Domain Analysis
Okay, so now you know where and how to find PBN domains, let’s dig into the analysis part of this guide.
Before you even think about buying an expired domain for a PBN you want to make sure that it is actually worth your hard earned bucks.
You specifically want to do the following:
Check Indexation
First of all you want to make sure, that the domain is still indexed.
While this is not a necessity, it is a good sign that the domain is suitable for a PBN.
To do that, simply go to Google.com, type in site:domain.com and check the results.
Example:

Takeaway: An indexed domain is a good domain 😉
Check Domain History
Next, you want to make sure that the domain has a clean history and has never been used as a PBN or for other rather shady or spammy techniques.
The easiest way to do that is by using Archive.org.
Archive.org gives you snapshots of the domain throughout it’s time in the WWW.
You want to click on those little circles for each individual year and spot check how the site looked in the past.
Example:

Takeaway: If it has never been used for a PBN or other spammy technique, you are good to go.
Check Domain Trademarks
Next up, you want to see if the domain name is currently trademarked. It would suck to have a company send you a C&D, only because you skipped this step.
Just do it, it takes literally a minute.
The easiest way to do check for active trademarks are these sites:
If the domain is not trademarked, you are good to go.
Takeaway: No trademarks? Cool, proceed.
Check the Link Profile
This is the most crucial step.
You want to make sure that the potentially interesting expired domain has strong links that are still live.
The easiest way to check all live links to a domain is via Ahrefs’ site explorer.
Go to ahrefs.com, enter the domain name and then navigate to “Site Explorer 2.0” -> “Backlinks”.
We recommend to use the following filters:
Then sort by DR (descending).
This will give you an overview of all the powerful contextual links pointing at a specific domain, to see if it’s worth it.
Here is BHW for example:
Ahrefs will also show you if those links are still live or if they dropped, which can give you a concise picture on the state of the link profile.
Takeaway: Make sure that the expired domain has strong (and live) backlinks. Preferrably contextual ones.
Check the Link Targets
Next, you want to check to which pages have the most links pointed to them.
You will want to re-create these pages on your PBN. So it’s imperative that you check this.
Go to “best by links” and sort by “referring domains”
This will give you an overview of where the links are pointed to and what pages you SHOULD re-create once your PBN is hosted and live.
Example:
Takeaway: Make sure that the links are pointed to pages you can re-create.
Check the Anchor Profile
Lastly, you want to take a look at the anchor profile of the potential PBN domain.
Ideally, you want your PBN domain to have a diverse anchor profile with <10% of exact match keyword anchors and no spammy sh*t.
Example:
Takeaway: Make sure that the expired domain has a diverse and natural anchor profile.
That’s it for the domain analysis part. Now let’s get into the most complex part of it all – the PBN setup and what footprints to avoid.
PBN FOOTPRINTS (TO AVOID)
So far we have learned:
Now let’s dig into the setup of a PBN. Let’s start with all the footprints you need to avoid and end with a step by step guide on how to host your next PBN site.
#1 Bad Hosting
This is typically the most common footprint we see.
You want to avoid shared hosting, VPS hosting or even worse PBN hosting at all costs.
We usually recommend to get one single droplets per PBN from reputable cloud hosting companies, like:
With those providers you can get truely unique and dedicated A, B and C-class IPs for each and every one of your PBN sites.
Quick breakdown:
Typically a IP is split into 4 blocks, namely AAA.BBB.CCC.DDD
We don’t want to host our PBNs on servers in the same C class and we also don’t want our PBN hosted with any other website. This is how huge networks got de-indexed in the past. So we want to avoid that at all cost.
Instead we want our PBNs hosted on different A, B AND C block, like this:
By going with cloud hosts you can get this level of IP diversity while leaving no virtual footprints.
It is definitely more expensive than other hosting options out there.
But it is oh-so-worth it.
Don’t use:
#2 Bad Registrars
Don’t register all domains on the same date and DON’T use dropcatch providers. We can recommend Dynadot, Name, Namesilo, GoDaddy.
#3 No Whois
In times of GDPR and privacy concerns, this is more of a privilege instead of a footprint. It’s completely free with most registars these days and highly recommended. Not having a private WhoIs probably leaves a bigger footprint.
#4 Custom Nameservers
The big cloud hosts we mentioned above all give you the option to use their DNS networks. This means you can use their nameservers, for example:
ns1.digitalocean.com, ns2.digitalocean.com etc.
These nameservers are used by hundreds and thousand of sites and apps, so you will blend right in with those.
We don’t recommend to use custom nameservers.
#5 Blocking Crawlers
If you know how Ahrefs et al. work, it makes no sense to block bots via .htaccess – unless you have an up to date IP list (which I bet you don’t).
Also, how many real sites block these crawlers? Right. So why would you, if 80%+ of all sites don’t?
In our opinion BLOCKING is the real footprint, especially when you use plugins like spiderblocker and co.
#6 Build unique PBNs
Having the same ugly a** layout for all of your PBNs will certainly leave a huge footprint.
You know the look, right? Simple free theme, full posts on the homepage and no customization whatsoever.
Ugh…
Instead you want to build real sites. Sites that pass a manual inspection if it ever comes to that.
Each PBN should have a custom logo and a custom layout (menus, stock images, design, etc.)
Today, the use of page builders makes it quite easy without leaving much of a footprint.
You really only need Elementor Pro + Astra/Hello/OceanWP Theme ; Divi and/or GeneratePress+GenerateBlocks to build 100s of unique sites. You can also invest into 4-5 of the top selling themes from Themeforest for more diversity.
In addition they all should have mandatory pages like about us, contact us, privacy policy, t&c, cookie policy, etc. GDPR compliance is mandatory these days and not having these on your PBNs will leave a certain footprint (albeit not as big).
We highly recommend to try and build sites that look unique and resemble real businesses.
You can easily find someone here on BHW that can help you with this.
#7 Use unique content
We mentioned that before.
We never, ever use thin (spun or worse) or scraped / expired content. The first is just garbage and the algorithm is just too smart these days, the later involves certain risks of copyright strike, which we absolutely want to avoid on a $500+ domain.
ALso don’t use scraped images (same reason -> copyright). Use stock free images from Pixabay or Pexels instead.
#8 Don’t interlink your PBNs
Duh. Self explanatory.
You also want to make sure, that the money sites that you link to are on separate and unique hosts.
#9 Build Links to your PBNs (optional)
Real sites lose and gain links all the time.
So it’s recommended to add a few quality tier 2 links into the mix.
This will not only help your PBN sites, but also your money site.
It’s not absolutely necessary, but incredibly helpful
#10 Use internal links on your PBNs
Real sites have a LOT of internal links. Not only can they help to pass link juice from internal pages to the homepage (and vice versa), but they can help to create topical relevance for the whole PBN site.
Definitely recommended.
#11 Skip GA/GSC
Don’t use Google Analytics or GSC on your PBN domain.
Another duh. Paranoia gets the best of us.
But why risk it?
#12 Use internal redirect correctly.
Some sites have more links pointed to the root version (non-www) some sites have more links pointed to the www. version. Make sure to know which one you want to use and redirect the other variant. Otherwise you may experience underwhelming results.
Also make sure to rebuilt inner pages that have links pointed to them with the exact same URL structure and add fresh content to those with internal links to the homepage.
We go into a bit more detail in this 301 thread.
#13 Say no to CloudFlare
It’s just not necessary.
Whoever tells you that it’s super useful to hide any footprints, has never run a large scale PBN.
You DON’T need it, if your hosting is done right.
#14 Say yes to SSL
While there are still many sites on non-SSL, it has become pretty much the standard for new sites.
It’s completely free with letsencrypt and we definitely recommend to add it to your new PBNs.
Having said that, a few years back SSLs were very pricey, so we still have a lot of PBN sites without SSL for PBN sites that are 5years+. Tbh, we’ve seen no adverse effects (yet). But ALL of our new builds are with SSL.
#15 Maintain your PBN
Keep your PBN sites updated (themes + plugins) and add non-commercial content once in a while.
This is just common sense.
We’ve had a few hacking attempts for some of our PBNs in the past years and we’ve learned from our mistakes.
Keep maintenance up and use a good security plugin like Wordfence.
Optional A: Create some social accounts for your PBNs. Not really necessary, but makes the site more legit.
Optional B: Use a caching plugin. We love WP-Rocket, but you can also use a free one from the WordPress directory.
Think that mostly covers the footprints.
PBN SETUP
One of the easiest ways to install WordPress on one of the clouds hosts are “one-click-apps”
Here’s a great video on how to do it on DigitalOcean:
It works similar on Vultr and Linode.
Alternative #1 – Use Runcloud.io
You can use also use server manager like Runcloud.io to connect your Digital Ocean / Vultr and Linode droplets.
From there you can easily install WordPress, SSLs and manage your service.
With RunCloud, you don’t need to be a Linux expert to build a website powered by DigitalOcean, AWS, or Google Cloud. Use our graphical interface and build a business on the cloud affordably.
However, it’s not free and comes at $12.5 / month – but you can manage unlimited servers on it.
Alternative #2 – Use Cloudways
You can also Cloudways to host your PBNs.
Cloudways is basically managed cloud hosting for the biggest providers like DigitalOcean, Vultr, Linode, AWS and Google Cloud.
You get the full percs of footprint free hosting with a managed service on top.
Downside: The price.
Te cheapest droplet is $10.00 / mo – which includes the $5.00 fee for the droplet itself and $5.00 for their managed service (basically)(.
If you only want to host a few PBNs and a few bucks more per month don’t hurt your wallet, go for it.
It’s super convenient and easy to install WordPress via Cloudways.
Here’s their guide on how to install a DigitalOcean Droplet: https://www.cloudways.com/blog/host-wordpress-on-Digitalocean
That’s it.
You see, hosting a site on a cloud host is not rocket science, especially with the help of one-click-apps or server managers like Runcloud.
Anyone can do it.
Now that the PBN site is live, you can get ready to link out.
How to link out from your PBN
Here are a few factor to keep in mind when linkin to your money sites.
Linking to just one page of your money site:
This is the best and safest approach to using your PBNs. By keeping OBL = 1 you leverage all of the link power. This is our recommended way to use PBNs. Of course you can target diff. inner pages on your money site by using separate PBNs. That’s totally fine. So PBN A links to moneysite.com/abc/ and PBN B links to moneysite.com/xyz/.
That’s fine.
Linking to several pages on one single money site:
You can link to more than one inner page on your money site from a single PBN, but we would recommend to use it VERY sparingly, as it can leave a footprint.
Linking to several money sites
Linking to more than one money site from a single PBN is fine, if the niche is somewhat related or suitable and the money sites don’t share any footprints (same hosting server, DNS, email, monetization).
Example: You could easily link to a tech affiliate blog AND a web dev site from one tech PBN, while linking to an insurance money site wouldn’t be ideal (tho you can still do it by using creative content topics).
In the end it’s up to you. We like to keep OBL = 1 or max. 2 for private dedicated PBNs.
FAQ – FREQUENTLY ANSWERED QUESTIONS
What anchors should I use?
Anchor diversity is something that you have to keep an eye on at all times. It’s super easy to overoptimize.
We like to keep our anchor profiles at the following ratios:
Having said that, PBNs are perfect to snipe exact match or phrase match anchors. But they also work well for branded and generic anchors.
The beauty here is that you are in full control of your anchors.
Should I display full posts on the homepage?
If you plan to keep the OBL = 1 on the homepage, you don’t even have to use full articles on the homepage.
You can make the site look like a business page instead and add the link (surrounded by at least 250-300 words of content) in one of the elements.
For example if you want to create a roofing PBN, you could use Astra’s Roofing template (https://websitedemos.net/roofing-services-02/) and add a anchored link here:
Obviously you want to adjust the template a bit, so it doesn’t look like the stock version.
But that’s just one example.
There are many ways you can go about this.
We also have PBNs where we only display excerpts via the content views pro plugin or use a script with an “expand” feature but in a way that the link is still visible and clickable. (for OBL > 1 cases)
We also have PBNs where we display several full posts on the homepage, fi the structure of the homepage allows for it. (for OBL > 1 cases or our PBN services)
We also always rebuild all inner pages that have decent links and add a fresh piece of content and a link to it. We power these up with a few more additional t2 links. We don’t always add them to the homepage, if the links are strong enough, hence the hybrid model.
How much content should I use on my PBN?
The bare minimum is 3000-5000 words of content, imo.
This does not include static content and content for legal and mandatory pages (contact, about, privacy, ToS, cookie policy etc.)
We add a few new article to each site every few months. But it’s not a priority. The baseline content is enough.
Do you guys use anything expect PBNs for your own sites?
Yes, of course.
We usually start like this (both national and local niches):
That’s a really good foundation of branded links for any site and you can build these right away without worrying too much about any algorithmic penalties.
You can probably get all those links sorted for < $2000 incl. content.
After that scale up and get more aggresive with anchors.
While doing all the link building, we try to emulate a natural anchor profile as shown above.
Does the PBN have to be 100% niche related? Will it still be effective if it’s not?
Yes, it will still be effective. You can still create relevancy on a page level instead of a domain level. However we do not recommend it.
But it works nonetheless.
Closing Thoughts
That’s it. Hope you liked the guide.
Now get to work and set up your first PBN.
as many of you like the AMA on PBNs and the 301 guide.
Let’s throw another guide onto the forums.
Grab some coffee. This is gonna be a bit longer.
Glossary
What is a PBN and why is everyone raving about them?
First let’s start with a basic definition: What exactly is a PBN?
PBN is short for “Private Blog Network“
And as the name suggests, it’s basically a network of expired domains with strong link profiles and clean histories that you leverage to funnel link equity to your money site. If it’s done right, the PBN should help improve your rankings over time.
Why does that work?
Well, as most of you already know, Google uses links as one of their key ranking factors.
It all started with a little algorithm called PageRank.
PageRank was used to determine the value of a site by looking at what other sites were linking to it. It was scored logarithmically on a range from 0 to 10. With 10 being the highest.
You can still read about it in the original paper (Link)
Pagerank eventually evolved to become the GOLDEN METRIC to determine the value of a backlink for years, up until Google discontinued the public display of it in 2016.
However, Google still uses PageRank internally:
The key takeaway here is that Google still uses links as one of their KEY ranking signals.
And while the search algorithm today is much more complex and advanced, links remain as important as ever.
There’s actually a really great study done by Perficient (Link) that shows the correlation between links and respective rankings in the SERPs in 2018 and 2019 (so rather recent).
Their results show that links still play a key part in ranking higher in the SERPs.
Cool story, bro. We already knew ALL that.
Okay, dude, chill your nuggets. I’ll explain why it’s important stoll good to know.
So, we’ve learned that Google loves links. But not just any type of link. You can’t just load up the ol’ xRumer and send a few hundreds thousands forum posts to your site. Those days are gone (sadly).
These days Google heavily favors CONTEXTUAL links.
By contextual I mean in-content links from sites with great link profiles and superb metrics. These can be guest posts, editorials, link insertions and, you guess it, PBNs!
Just imagine having a small PBN of powerhouse domains that only YOU control. You say what goes where.
Sounds pretty awesome, right? It is.
Here’s just a small glance at one of our low-key PBNs:
Don’t you think owning a small network like this would be a huge asset for your overall SEO success?
Even for smaller niches with low-mid competitive keywords.
Yep, we think so too.
That’s why we love PBNs and use them for almost all of our own sites.
However, building, running and especically scaling a PBN comes with certain risks.
RISKS OF A PBN
As you may know, Google is highly AGAINST any type of active link building. According to their guidelines:
“Any links intended to manipulate PageRank or a site’s ranking in Google search results may be considered part of a link scheme and a violation of Google’s Webmaster Guidelines.”
So, by definition, any type of link building you do is against their guidelines.
But fuck it, this is Blackhatworld, not Webmastercentral.
We love building links. We always have.
We just need to be extra cautious these days. Especially since we don’t know what Google is planning for future algo updates.
The fact is that links stillö work. They work SOOOOO f*king well, that all the big players out there use PBNs to rank their sites.
However, building a PBN is not a simply task.
You can’t just buy a random domain, host it wherever, slap on a free theme and link to all your site. Nuh-uh. Big no no.
By doing that, you will leave a lot of so-called digital ‘footprints’ in the proverbial sand that Google can find. If they do, you will end up in the ‘penalty zone’ sooner than later.
For those of you that were already here in 2012-2014, you’ll probably remember the big blog networks like ALN or BMR?
Incredibly powerful networks that worked like a treat. Sites were ranking left and right and it was beautiful.
However it was not long until Google found all their PBNs and penalized the whole network including the sites that bought links on it.
It sucked. BIG time.
Source: Archive.org
So, in order to keep your PBN safe, you need to avoid these dreaded ‘footprints’ at all costs.
In addition to those risks, a PBN can become quite expensive. I’ll just quote myself here.
And that’s just a bare minimum.
For really good domains, i’d ballpark it somewhere between $500 and $2000 per site.
Yep, PBNs are not cheap. But with high risks come high rewards.
So for those of you who are not scared to spend money to make money, read on.
WHERE TO FIND PBN DOMAINS?
Okay, so we now know that PBNs work excpetionally well to help your rankings.
We also learned that PBNs are only as good as the domains that it is built on.
So where do you find these golden nugget domains with incredible metrics, link profiles and age?
Well, there are basically two options you have: Buy them from a vendor or find them yourself.
DOMAIN VENDORS
Many of your probably don’t have the time, expertise or patience to sift through hundreds and thousands of expiring domains every day.
The good news is that there are domain vendors, that did all the groundwork for you. They went through the abundance of garbage domains out there, bid at auctions, hassled with site sellers and scraped until their di*ks fell off.
That’s a lot of work. So, clearly, you have to pay a pretty penny for these domains.
Having said that, if it saves you valuable time, it’s a no brainer. Most of the domains offered by vendors all have great DR and RD with a balanced link and anchor profile.
There are several good domain vendors here on BHW, that you can try out. I don’t want to give any recommendations.
FINDING THEM YOURSELF
If you don’t want to use a vendor, you have to find your PBN domains yourself.
We recommend to use
for that.
It’s completely free to use and integrates with the biggest domain marketplaces.
There are several stages that an expiring domain goes through. And, technically speaking, a domain can be snatched up during different times of that expiration process.
Stages of an expiring domain
Renewal Grace Period – the domain owner still has a few days to renewe their domain. During this time there is no way to bid or buy the domain in question.
Domain Auction Period – if the domain owner decides not to renew the domain, the domain moves into the auction phase. Here you can bid on the domain name and the highest bidder usually get the domain. This is one of the best times to snap up a really good PBN domain, but know that you won’t be the only one bidding for the domains. GoDaddy, in particular, has a HUGE auction marketplace, where hundreds and thousands of bid are added every day.
You can check them here (for Godaddy): https://member.expireddomains.net/domains/godaddyexpired/?o=bids&r=d#listing
Clouseout Period – if the domain is not successfully sold at auction, it will become a ‘clouseout domain’. These can be purchased for a fixed price and are available for a few days. There are quite a few gold nuggets in here that people overlooked at auctions, so you may get lucky.
You can browse through them here (for GoDaddy): https://member.expireddomains.net/domains/godaddycloseouts/ (GoDaddy)
Pending Deletion Period – if the domain has not been sold at clouseout, it will move into the ‘pending deletion stage’. After that it will become available to the public for everyone to register.
At this point it would make sense to use a backorder / dropcatch service to register the domain once it drops to make sure that you get it before anyone else does.
Good dropcatch providers are SnapNames.com, Dropcatch.com or Nicsell.com
You can browse through all pending delete domains here: https://member.expireddomains.net/domains/pendingdelete/ or https://member.expireddomains.net/domains/dropcatchauctions/
Deleted Domains – if no one dropcatched the domain or no backorders have been placed, the domain will become available to everyone again.
There are literally millions of domains available in this stage and most of them are utter garbage. But who knows, maybe a domain vendor overlooked a nice domain. If youre lucky, you still may find a domain that you can use (but don’t expect too much)
You can browse through them here: https://member.expireddomains.net/domains/combinedexpired/
PBN Domain Analysis
Okay, so now you know where and how to find PBN domains, let’s dig into the analysis part of this guide.
Before you even think about buying an expired domain for a PBN you want to make sure that it is actually worth your hard earned bucks.
You specifically want to do the following:
Check Indexation
First of all you want to make sure, that the domain is still indexed.
While this is not a necessity, it is a good sign that the domain is suitable for a PBN.
To do that, simply go to Google.com, type in site:domain.com and check the results.
Example:
Takeaway: An indexed domain is a good domain 😉
Check Domain History
Next, you want to make sure that the domain has a clean history and has never been used as a PBN or for other rather shady or spammy techniques.
The easiest way to do that is by using Archive.org.
Archive.org gives you snapshots of the domain throughout it’s time in the WWW.
You want to click on those little circles for each individual year and spot check how the site looked in the past.
Example:
Takeaway: If it has never been used for a PBN or other spammy technique, you are good to go.
Check Domain Trademarks
Next up, you want to see if the domain name is currently trademarked. It would suck to have a company send you a C&D, only because you skipped this step.
Just do it, it takes literally a minute.
The easiest way to do check for active trademarks are these sites:
If the domain is not trademarked, you are good to go.
Takeaway: No trademarks? Cool, proceed.
Check the Link Profile
This is the most crucial step.
You want to make sure that the potentially interesting expired domain has strong links that are still live.
The easiest way to check all live links to a domain is via Ahrefs’ site explorer.
Go to ahrefs.com, enter the domain name and then navigate to “Site Explorer 2.0” -> “Backlinks”.
We recommend to use the following filters:
Then sort by DR (descending).
This will give you an overview of all the powerful contextual links pointing at a specific domain, to see if it’s worth it.
Here is BHW for example:
Ahrefs will also show you if those links are still live or if they dropped, which can give you a concise picture on the state of the link profile.
Takeaway: Make sure that the expired domain has strong (and live) backlinks. Preferrably contextual ones.
Check the Link Targets
Next, you want to check to which pages have the most links pointed to them.
You will want to re-create these pages on your PBN. So it’s imperative that you check this.
Go to “best by links” and sort by “referring domains”
This will give you an overview of where the links are pointed to and what pages you SHOULD re-create once your PBN is hosted and live.
Example:
Takeaway: Make sure that the links are pointed to pages you can re-create.
Check the Anchor Profile
Lastly, you want to take a look at the anchor profile of the potential PBN domain.
Ideally, you want your PBN domain to have a diverse anchor profile with <10% of exact match keyword anchors and no spammy sh*t.
Example:
Takeaway: Make sure that the expired domain has a diverse and natural anchor profile.
That’s it for the domain analysis part. Now let’s get into the most complex part of it all – the PBN setup and what footprints to avoid.
PBN FOOTPRINTS (TO AVOID)
So far we have learned:
Now let’s dig into the setup of a PBN. Let’s start with all the footprints you need to avoid and end with a step by step guide on how to host your next PBN site.
#1 Bad Hosting
This is typically the most common footprint we see.
You want to avoid shared hosting, VPS hosting or even worse PBN hosting at all costs.
We usually recommend to get one single droplets per PBN from reputable cloud hosting companies, like:
With those providers you can get truely unique and dedicated A, B and C-class IPs for each and every one of your PBN sites.
Quick breakdown:
Typically a IP is split into 4 blocks, namely AAA.BBB.CCC.DDD
We don’t want to host our PBNs on servers in the same C class and we also don’t want our PBN hosted with any other website. This is how huge networks got de-indexed in the past. So we want to avoid that at all cost.
Instead we want our PBNs hosted on different A, B AND C block, like this:
By going with cloud hosts you can get this level of IP diversity while leaving no virtual footprints.
It is definitely more expensive than other hosting options out there.
But it is oh-so-worth it.
Don’t use:
#2 Bad Registrars
Don’t register all domains on the same date and DON’T use dropcatch providers. We can recommend Dynadot, Name, Namesilo, GoDaddy.
#3 No Whois
In times of GDPR and privacy concerns, this is more of a privilege instead of a footprint. It’s completely free with most registars these days and highly recommended. Not having a private WhoIs probably leaves a bigger footprint.
#4 Custom Nameservers
The big cloud hosts we mentioned above all give you the option to use their DNS networks. This means you can use their nameservers, for example:
ns1.digitalocean.com, ns2.digitalocean.com etc.
These nameservers are used by hundreds and thousand of sites and apps, so you will blend right in with those.
We don’t recommend to use custom nameservers.
#5 Blocking Crawlers
If you know how Ahrefs et al. work, it makes no sense to block bots via .htaccess – unless you have an up to date IP list (which I bet you don’t).
Also, how many real sites block these crawlers? Right. So why would you, if 80%+ of all sites don’t?
In our opinion BLOCKING is the real footprint, especially when you use plugins like spiderblocker and co.
#6 Build unique PBNs
Having the same ugly a** layout for all of your PBNs will certainly leave a huge footprint.
You know the look, right? Simple free theme, full posts on the homepage and no customization whatsoever.
Ugh…
Instead you want to build real sites. Sites that pass a manual inspection if it ever comes to that.
Each PBN should have a custom logo and a custom layout (menus, stock images, design, etc.)
Today, the use of page builders makes it quite easy without leaving much of a footprint.
You really only need Elementor Pro + Astra/Hello/OceanWP Theme ; Divi and/or GeneratePress+GenerateBlocks to build 100s of unique sites. You can also invest into 4-5 of the top selling themes from Themeforest for more diversity.
In addition they all should have mandatory pages like about us, contact us, privacy policy, t&c, cookie policy, etc. GDPR compliance is mandatory these days and not having these on your PBNs will leave a certain footprint (albeit not as big).
We highly recommend to try and build sites that look unique and resemble real businesses.
You can easily find someone here on BHW that can help you with this.
#7 Use unique content
We mentioned that before.
We never, ever use thin (spun or worse) or scraped / expired content. The first is just garbage and the algorithm is just too smart these days, the later involves certain risks of copyright strike, which we absolutely want to avoid on a $500+ domain.
ALso don’t use scraped images (same reason -> copyright). Use stock free images from Pixabay or Pexels instead.
#8 Don’t interlink your PBNs
Duh. Self explanatory.
You also want to make sure, that the money sites that you link to are on separate and unique hosts.
#9 Build Links to your PBNs (optional)
Real sites lose and gain links all the time.
So it’s recommended to add a few quality tier 2 links into the mix.
This will not only help your PBN sites, but also your money site.
It’s not absolutely necessary, but incredibly helpful
#10 Use internal links on your PBNs
Real sites have a LOT of internal links. Not only can they help to pass link juice from internal pages to the homepage (and vice versa), but they can help to create topical relevance for the whole PBN site.
Definitely recommended.
#11 Skip GA/GSC
Don’t use Google Analytics or GSC on your PBN domain.
Another duh. Paranoia gets the best of us.
But why risk it?
#12 Use internal redirect correctly.
Some sites have more links pointed to the root version (non-www) some sites have more links pointed to the www. version. Make sure to know which one you want to use and redirect the other variant. Otherwise you may experience underwhelming results.
Also make sure to rebuilt inner pages that have links pointed to them with the exact same URL structure and add fresh content to those with internal links to the homepage.
We go into a bit more detail in this 301 thread.
#13 Say no to CloudFlare
It’s just not necessary.
Whoever tells you that it’s super useful to hide any footprints, has never run a large scale PBN.
You DON’T need it, if your hosting is done right.
#14 Say yes to SSL
While there are still many sites on non-SSL, it has become pretty much the standard for new sites.
It’s completely free with letsencrypt and we definitely recommend to add it to your new PBNs.
Having said that, a few years back SSLs were very pricey, so we still have a lot of PBN sites without SSL for PBN sites that are 5years+. Tbh, we’ve seen no adverse effects (yet). But ALL of our new builds are with SSL.
#15 Maintain your PBN
Keep your PBN sites updated (themes + plugins) and add non-commercial content once in a while.
This is just common sense.
We’ve had a few hacking attempts for some of our PBNs in the past years and we’ve learned from our mistakes.
Keep maintenance up and use a good security plugin like Wordfence.
Optional A: Create some social accounts for your PBNs. Not really necessary, but makes the site more legit.
Optional B: Use a caching plugin. We love WP-Rocket, but you can also use a free one from the WordPress directory.
Think that mostly covers the footprints.
PBN SETUP
One of the easiest ways to install WordPress on one of the clouds hosts are “one-click-apps”
Here’s a great video on how to do it on DigitalOcean:
It works similar on Vultr and Linode.
Alternative #1 – Use Runcloud.io
You can use also use server manager like Runcloud.io to connect your Digital Ocean / Vultr and Linode droplets.
From there you can easily install WordPress, SSLs and manage your service.
With RunCloud, you don’t need to be a Linux expert to build a website powered by DigitalOcean, AWS, or Google Cloud. Use our graphical interface and build a business on the cloud affordably.
However, it’s not free and comes at $12.5 / month – but you can manage unlimited servers on it.
Alternative #2 – Use Cloudways
You can also Cloudways to host your PBNs.
Cloudways is basically managed cloud hosting for the biggest providers like DigitalOcean, Vultr, Linode, AWS and Google Cloud.
You get the full percs of footprint free hosting with a managed service on top.
Downside: The price.
Te cheapest droplet is $10.00 / mo – which includes the $5.00 fee for the droplet itself and $5.00 for their managed service (basically)(.
If you only want to host a few PBNs and a few bucks more per month don’t hurt your wallet, go for it.
It’s super convenient and easy to install WordPress via Cloudways.
Here’s their guide on how to install a DigitalOcean Droplet: https://www.cloudways.com/blog/host-wordpress-on-Digitalocean
That’s it.
You see, hosting a site on a cloud host is not rocket science, especially with the help of one-click-apps or server managers like Runcloud.
Anyone can do it.
Now that the PBN site is live, you can get ready to link out.
How to link out from your PBN
Here are a few factor to keep in mind when linkin to your money sites.
Linking to just one page of your money site:
This is the best and safest approach to using your PBNs. By keeping OBL = 1 you leverage all of the link power. This is our recommended way to use PBNs. Of course you can target diff. inner pages on your money site by using separate PBNs. That’s totally fine. So PBN A links to moneysite.com/abc/ and PBN B links to moneysite.com/xyz/.
That’s fine.
Linking to several pages on one single money site:
You can link to more than one inner page on your money site from a single PBN, but we would recommend to use it VERY sparingly, as it can leave a footprint.
Linking to several money sites
Linking to more than one money site from a single PBN is fine, if the niche is somewhat related or suitable and the money sites don’t share any footprints (same hosting server, DNS, email, monetization).
Example: You could easily link to a tech affiliate blog AND a web dev site from one tech PBN, while linking to an insurance money site wouldn’t be ideal (tho you can still do it by using creative content topics).
In the end it’s up to you. We like to keep OBL = 1 or max. 2 for private dedicated PBNs.
FAQ – FREQUENTLY ANSWERED QUESTIONS
What anchors should I use?
Anchor diversity is something that you have to keep an eye on at all times. It’s super easy to overoptimize.
We like to keep our anchor profiles at the following ratios:
Having said that, PBNs are perfect to snipe exact match or phrase match anchors. But they also work well for branded and generic anchors.
The beauty here is that you are in full control of your anchors.
Should I display full posts on the homepage?
If you plan to keep the OBL = 1 on the homepage, you don’t even have to use full articles on the homepage.
You can make the site look like a business page instead and add the link (surrounded by at least 250-300 words of content) in one of the elements.
For example if you want to create a roofing PBN, you could use Astra’s Roofing template (https://websitedemos.net/roofing-services-02/) and add a anchored link here:
Obviously you want to adjust the template a bit, so it doesn’t look like the stock version.
But that’s just one example.
There are many ways you can go about this.
We also have PBNs where we only display excerpts via the content views pro plugin or use a script with an “expand” feature but in a way that the link is still visible and clickable. (for OBL > 1 cases)
We also have PBNs where we display several full posts on the homepage, fi the structure of the homepage allows for it. (for OBL > 1 cases or our PBN services)
We also always rebuild all inner pages that have decent links and add a fresh piece of content and a link to it. We power these up with a few more additional t2 links. We don’t always add them to the homepage, if the links are strong enough, hence the hybrid model.
How much content should I use on my PBN?
The bare minimum is 3000-5000 words of content, imo.
This does not include static content and content for legal and mandatory pages (contact, about, privacy, ToS, cookie policy etc.)
We add a few new article to each site every few months. But it’s not a priority. The baseline content is enough.
Do you guys use anything expect PBNs for your own sites?
Yes, of course.
We usually start like this (both national and local niches):
That’s a really good foundation of branded links for any site and you can build these right away without worrying too much about any algorithmic penalties.
You can probably get all those links sorted for < $2000 incl. content.
After that scale up and get more aggresive with anchors.
While doing all the link building, we try to emulate a natural anchor profile as shown above.
Does the PBN have to be 100% niche related? Will it still be effective if it’s not?
Yes, it will still be effective. You can still create relevancy on a page level instead of a domain level. However we do not recommend it.
But it works nonetheless.
Closing Thoughts
That’s it. Hope you liked the guide.
Now get to work and set up your first PBN.
身為網頁UI設計師,不僅要隨時掌握設計新知、尋找設計靈感,或者因為需要高效率產出,而使用設計素材,正所謂『工欲善其事,必先利其器。』,這邊要來分享我常用到的設計資源與工具,以及我平常學習的網路資源、Podcast。
Behance、Dribbble、Pinterest這三個已經是設計師最熟知也常用的社群平台,集合非常優秀的設計師作品,下面也介紹幾個優秀的中文社群平台
注意:
Muzli和Panda安裝後都會成為Chrome開啟的預設頁面,但兩者無法同時顯示和切換,所以建議可以用不同瀏覽器做安裝,或是純粹使用網頁版本
延伸閱讀:
線上作品集網站不求人,8個設計師常用的方法
提升設計效率?網頁UI設計師必裝的7個Chrome擴充插件
若你喜歡我的這篇文章,麻煩拍5次下面小手給予我支持與鼓勵喔!


