JR Kyushu sightseeing trains are renowned for their unique designs and stunning scenery along the routes. With a wide variety of themed trains, travelers can enjoy Kyushu’s natural landscapes and cultural charm in a comfortable and immersive way.
Train Types & Features
Yufuin no Mori
Features: Luxurious interior design, specially created for travelers heading to Yufuin Onsen. Route: Hakata – Yufuin – Beppu Eligible JR PASS: All Kyushu Pass, Northern Kyushu Pass
Aso Boy!
Features: Ideal for family travel, featuring play areas designed especially for children. Route: Kumamoto – Aso – Miyaji Eligible JR PASS: All Kyushu Pass, Southern Kyushu Pass
A-Train (Take the A-Train)
Features: A blend of modern and retro design, with premium drink services onboard. Route: Kumamoto – Misumi Eligible JR PASS: All Kyushu Pass, Northern Kyushu Pass
Ibusuki no Tamatebako
Features: A “surprise treasure box” themed train with breathtaking window views. Route: Kagoshima-Chuo – Ibusuki Eligible JR PASS: All Kyushu Pass, Southern Kyushu Pass
36+3
Features: A luxury sightseeing train covering five regions of Kyushu, offering high-end dining experiences. Route: Routes vary by operating day; please refer to the official timetable. Eligible JR PASS: Not applicable
Daily Services & Applicable Passes
Train schedules may vary on holidays or special dates. Passengers should always check the official JR Kyushu timetable in advance.
Some trains are only available to holders of specific JR PASS types, such as the Northern Kyushu Pass or Southern Kyushu Pass.
Travel Tips
Book Early: Popular sightseeing trains have limited seats; advance reservations are highly recommended.
Choose the Right PASS: Select the JR PASS that best fits your itinerary to reduce travel costs.
Enjoy Onboard Services: Many trains offer regional specialties and beverages, making the journey itself a culinary experience.
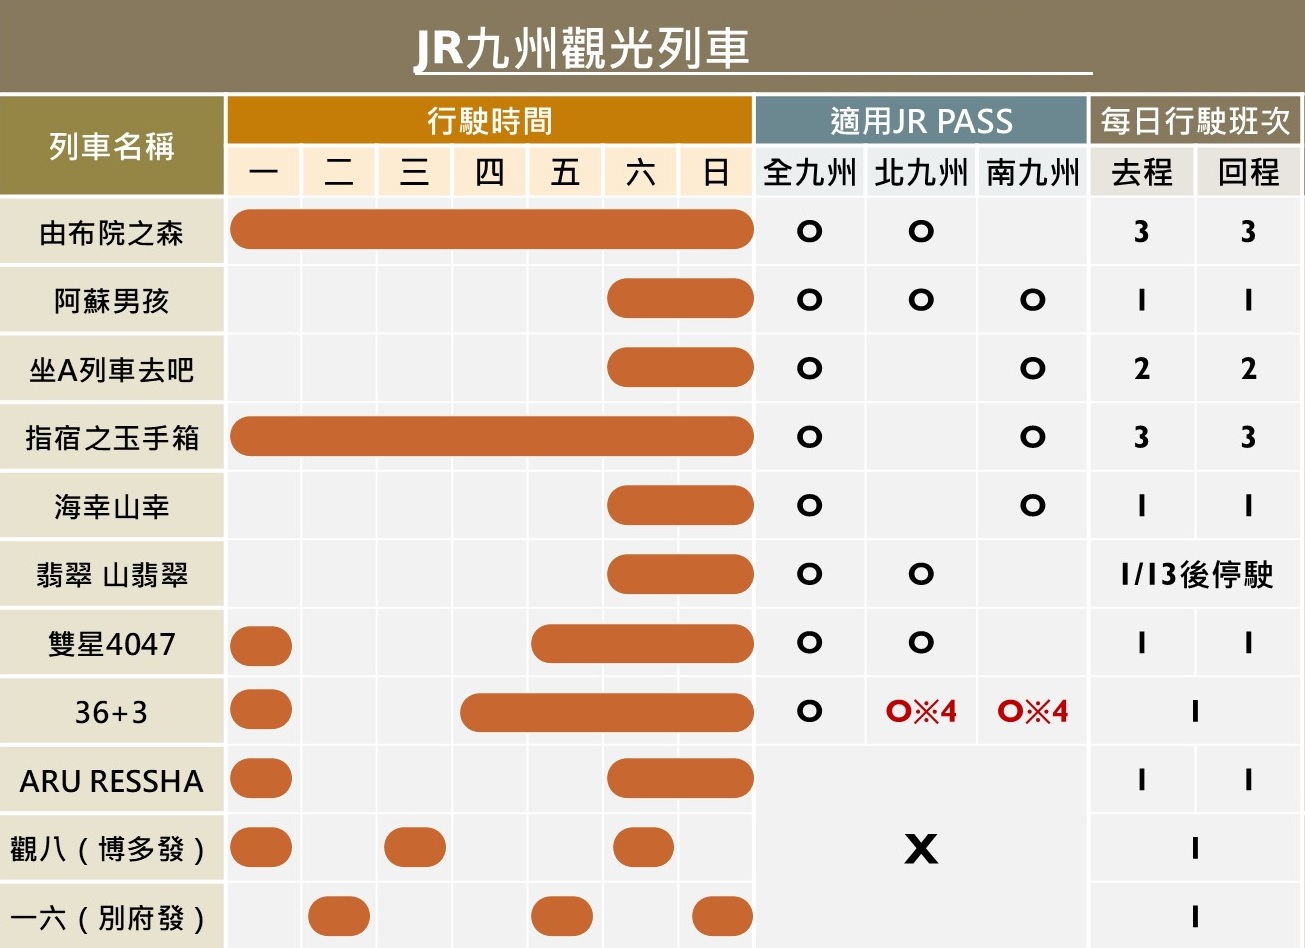
JR Kyushu sightseeing trains Routes
Kyushu has a total of 10 JR sightseeing trains, with the following main routes (major stations only):
Yufuin no Mori: Hakata ⇔ Kurume ⇔ Yufuin ⇔ Oita ⇔ Beppu
Kanpachi: Hakata ⇒ Tanushimaru ⇒ Yufuin ⇒ Oita ⇒ Beppu
Ichiroku: Beppu ⇒ Oita ⇒ Yufuin ⇒ Kurume ⇒ Hakata
These 10 sightseeing trains are subject to different JR PASS coverage depending on the region.
Other Important Notes
Yufuin no Mori can travel as far as Beppu (Trains No. 3 & 4). On certain dates, this extended route may be suspended—please check the official timetable.
Aso Boy!, A-Train, and Umisachi Yamasachi operate even on Japanese national holidays.
Aso Boy! may operate on additional dates with no onboard services and all non-reserved seating.
After March 15, 2025, Aso Boy! will operate only two daily services and will terminate at Miyaji (no longer stopping at Oita or Beppu).
Two Stars 4047 may suspend service for an entire month at times—always check the official timetable.
The outbound and return routes of Two Stars 4047 stop at different stations.
36+3 operates from Thursday to Monday, but the route changes daily; different JR PASS coverage applies depending on the route.
Kanpachi & Ichiroku are actually one-way services departing from different origins:
Kanpachi departs from Hakata
Ichiroku departs from Beppu
For more detailed information on Kyushu sightseeing trains, please refer to the route map images, which make planning a Kyushu railway journey even more convenient.
Guide for Foreign Travelers: Using JR Pass for Kyushu Sightseeing Trains
For foreign travelers, Kyushu’s JR sightseeing trains are not only a scenic journey but also a convenient way to explore multiple regions without worrying about individual tickets. Using a JR Pass is the most cost-effective and flexible way to enjoy these trains.
Why Choose a JR Pass?
Unlimited Travel in Eligible Areas: With the right JR Pass, you can ride multiple sightseeing trains like Yufuin no Mori, Aso Boy!, and Ibusuki no Tamatebako without buying separate tickets.
Save Money: Instead of purchasing individual tickets, a JR Pass allows you to cover long-distance routes across Northern, Southern, or All Kyushu regions.
Easy Reservations: JR Pass holders can reserve seats in advance on most sightseeing trains, ensuring a smooth and stress-free journey.
Flexible Planning: Adjust your itinerary on the fly, without worrying about ticket availability for each leg of the journey.
Recommended JR Passes for Sightseeing Trains
Sightseeing Train
Recommended JR Pass
Yufuin no Mori
All Kyushu Pass, Northern Kyushu Pass
Aso Boy!
All Kyushu Pass, Southern Kyushu Pass
A-Train
All Kyushu Pass, Northern Kyushu Pass
Ibusuki no Tamatebako
All Kyushu Pass, Southern Kyushu Pass
36+3
Not applicable
Tip: Check train schedules in advance, as some trains operate on limited days or special dates.
Travel Tips for Foreign Visitors
Book Seats Early: Popular sightseeing trains often sell out quickly. Advance reservation is highly recommended.
Choose the Right Pass: Select Northern, Southern, or All Kyushu Pass depending on your route to maximize cost savings.
Enjoy Local Flavors Onboard: Many trains serve regional specialties and drinks, turning your journey into a culinary experience.
Check Timetables: Some trains have different routes or operating days. For example, 36+3 has a different route each day, and Two Stars 4047 may suspend service for an entire month.
Where to Get a JR Pass
Foreign travelers can purchase JR Passes online before arriving in Japan. This ensures a smooth start to your Kyushu adventure, with reserved seats on your first sightseeing train.
👉 Check JR Pass prices and reserve your pass here
Experience Kyushu in comfort, enjoy scenic landscapes, and travel smart with a JR Pass—your gateway to Japan’s most beautiful trains.
Now that Spotify Lossless is officially here, millions of users are asking the same questions:
Is Spotify’s lossless audio real “Hi-Fi”?
How does Spotify Lossless compare with Apple Music, TIDAL, KKBOX, and Qobuz?
Does Spotify Lossless work in Taiwan and other Asian markets?
What hardware do you actually need to hear a difference?
And does Spotify Lossless sound any better through Bluetooth?
This guide breaks down everything you should know — from the evolution of Spotify’s audio quality, to how lossless streaming works, to the exact steps for enabling Spotify Lossless on your phone or desktop. We’ll also discuss the biggest factor that determines whether you’ll actually hear a difference: your playback hardware.
Whether you’re an audiophile, a curious Spotify user, or someone deciding between Spotify Lossless vs. Apple Music Lossless, this in-depth guide will help you understand what Spotify is really offering and whether it’s worth switching your listening setup.
Section 1 — Spotify Audio Quality: From Lossy to Lossless
Before jumping into Spotify Lossless, it’s important to understand what Spotify offered before this update. Spotify’s audio quality varies depending on your subscription type and playback device.
Spotify’s Existing Audio Quality Options
Subscription
Playback Device
Supported Bitrate
Codec
Spotify Free
Web Player
AAC 128 kbps
AAC
Mobile / Desktop App
Auto, Low (~24 kbps), Normal (~96 kbps), High (~160 kbps)
Ogg Vorbis
Spotify Premium
Web Player
AAC 256 kbps
AAC
Mobile / Desktop App
Auto, Low (~24 kbps), Normal (~96 kbps), High (~160 kbps), Very High (~320 kbps)
Ogg Vorbis
For years, Premium users relied on the “Very High” (320kbps) setting. While it sounds clear and natural, it still can’t match CD-quality audio in terms of dynamic range, micro-details, and clarity.
Now, let’s move into what everyone has been waiting for: Spotify Lossless.
Section 2 — Spotify Lossless: What’s New?
After years of leaks, delays, and hints, Spotify is finally launching its long-requested lossless audio tier — and the best part is:
Spotify Lossless is included for free with Premium.
No extra charge. No added tier.
Spotify Lossless uses the FLAC (Free Lossless Audio Codec) format, an open-source compression method that preserves every detail of the original recording without introducing any quality loss.
Spotify Lossless Technical Specs
Codec: FLAC
Bit Depth: Up to 24-bit
Sample Rate:44.1 kHz
This places Spotify Lossless above standard CD quality (16-bit/44.1kHz) and closer to studio-grade audio, offering improved clarity, texture, and spatial detail.
Even better — unlike many competitors — Spotify does not require a separate Hi-Fi plan. It’s part of your regular Premium subscription.
How to Enable Spotify Lossless (Mobile & Desktop)
Now that Spotify Lossless is officially rolling out, Premium subscribers can enable it in just a few minutes. The feature is being released in waves across more than 50 global markets — including Taiwan — so some users may see the setting sooner than others. If the Lossless option hasn’t appeared yet, updating your app and waiting a few days usually solves it.
Below is a clear, step-by-step guide for enabling Spotify Lossless on both mobile and desktop.
How to Turn On Spotify Lossless on Mobile (iPhone & Android)
Open the Spotify App Tap your profile icon in the upper-right corner to access the main menu.
Go to “Settings & Privacy.”
Tap “Audio Quality” or “Media Quality.”
Change your streaming and download quality to “Lossless (FLAC).” You’ll find this under both:
Wi-Fi Streaming
Download Quality
Turn off “Automatic Quality.” Auto-adjustment may downgrade your audio based on network conditions, so disable it if you want consistent lossless playback.
Disable “Normalize Volume.” This feature evens out volume across songs, but it can reduce dynamic range — an important part of lossless audio. You’ll find this under: Settings → Playback (or Replay)
Once these steps are done, Spotify will automatically stream compatible tracks in FLAC lossless quality when available.
How to Enable Spotify Lossless on Desktop (Windows & macOS)
Open the Spotify desktop app.
Click your profile icon in the top-right corner and go to Settings.
Scroll to the Audio Quality section.
Set both Streaming Quality and Download Quality to Lossless (FLAC).
Disable:
Automatic Quality Adjustment
Normalize Volume (labeled as “Set the same volume level for all songs”)
When you play a track that supports FLAC, Spotify may display a “Lossless” badge near the playback controls, depending on your region and app version.
Why You May Not See the Spotify Lossless Option Yet
Even with the latest version installed, some users won’t immediately see the Lossless toggle. This is normal — Spotify is enabling the feature server-side.
Try the following if you don’t see it:
Update the Spotify app to the newest version
Log out and log back in
Force close and reopen the app
Wait 24–72 hours (Spotify rolls out in batches)
Most users who didn’t see it at first reported that it appeared within a few days.
What You Actually Need for True Spotify Lossless
Activating Spotify Lossless is easy — but hearing the full benefit is another story. Even though Spotify now streams in 24-bit/44.1 kHz FLAC, the sound quality you experience depends heavily on your hardware setup.
A common misconception is that choosing “Lossless” in the app instantly guarantees a high-fidelity experience. In reality, your headphones, DAC, and the way you connect them matter far more than the bit-rate on screen.
Let’s break down what actually affects your listening experience.
Bluetooth: The #1 Bottleneck Most People Overlook
Most users listen through Bluetooth headphones, but Bluetooth audio is inherently compressed — even when the source file is lossless. This means Spotify’s lossless FLAC gets recompressed during transmission, and the final signal is not lossless by the time it reaches your headphones.
Apple ecosystem (iPhone + AirPods)
Uses AAC Bluetooth codec
Maxes out around 256 kbps
Far below true lossless bandwidth requirements Even AirPods Max cannot play lossless wirelessly.
Android ecosystem
Some Android devices support higher-bitrate codecs:
aptX HD
aptX Adaptive
LDAC (up to 990 kbps)
LDAC gets closer to lossless but is still lossy. In real-world use — especially in “Adaptive” mode — bitrates may drop well below 990 kbps.
Bottom line
Even with Spotify Lossless turned on, Bluetooth will make 320 kbps and Lossless sound almost identical for most listeners.
If you want the real benefit of FLAC lossless, you need to avoid Bluetooth entirely.
How to Experience Real (True) Lossless: What You Need
1. Use Wired Headphones
This is the simplest and most effective solution. A wired connection preserves the full FLAC signal without re-encoding.
Works with:
Standard 3.5mm headphones
Lightning/USB-C headphones
Over-ear audiophile headphones
For iPhone users with no 3.5mm jack, you can use:
Apple USB-C to 3.5mm dongle
Any high-quality USB-C DAC dongle
2. Use an External DAC (Digital-to-Analog Converter)
Every phone has a built-in DAC, but they vary widely in quality. A dedicated DAC provides:
Cleaner sound
Better separation between instruments
More accurate dynamic range
Lower distortion and noise
Portable DACs (USB dongle style) include:
AudioQuest DragonFly
FiiO KA1 / KA3
iBasso DC series
Moondrop MoonRiver 2
A DAC is not mandatory for beginners — but for audiophiles, it makes a noticeable difference.
3. Use a Proper Hi-Fi System or Streamer
If you’re using speakers or home audio, consider:
A receiver with Spotify Connect
A network streamer (e.g., WiiM, Bluesound Node)
A DAC/amplifier combo
With a wired connection, these devices can fully reproduce Spotify’s lossless FLAC audio.
So, Do You Really Need Expensive Gear?
Not necessarily.
For most people
A decent pair of wired earbuds already unlocks more of Spotify Lossless than any Bluetooth headphone on the market.
For enthusiasts
A $50–$150 DAC + wired IEMs can outperform wireless headphones costing $500+.
For audiophiles
Spotify Lossless still isn’t “true Hi-Res,” but with the right setup, the improvement over 320 kbps is noticeable in:
micro-details
soundstage width
instrument separation
treble extension
dynamic range
Risk Profiles and How They Shape Your U.S. Stock Strategy
Understanding your personal risk profile is one of the most important steps before choosing any U.S. stock investment strategy. Many new investors skip this step and jump straight into stock picking, which often leads to emotional decisions, panic selling, or unrealistic expectations. In the U.S. financial industry, risk profiling is a standard procedure used by brokerage firms, advisors, and automated portfolio tools because it directly determines what type of portfolio structure makes sense for each individual.
Below are the four major investor risk profiles commonly referenced in the U.S. market, along with how each profile typically allocates assets, maintains discipline, and makes decisions during market volatility.
1. Conservative Investor
A conservative investor prioritizes capital preservation above all else. The goal is not to beat the market—it’s to avoid large drawdowns that may take years to recover from.
Characteristics:
Low tolerance for volatility
Prefers stable, predictable returns
Often invests for income rather than growth
Prefers well-established companies and low-risk assets
Typical Portfolio Behavior in the U.S.:
Heavy focus on fixed income (Treasuries, investment-grade corporate bonds)
May invest in large-cap defensive stocks such as utilities, healthcare, or consumer staples
Prioritizes dividend stability over aggressive share-price appreciation
Ideal For: Retirees, near-retirees, or anyone who feels stressed when seeing market fluctuations above 5–10%.
2. Moderate Investor
A moderate investor wants a balance between protecting capital and pursuing reasonable long-term growth. They can tolerate short-term volatility as long as the long-term trend is positive.
Characteristics:
Accepts short-term fluctuations
Has a strong preference for diversification
Prioritizes a balanced approach of income + growth
Comfortable with blue-chip stocks and index funds
Typical Portfolio Behavior in the U.S.:
A mix of bonds and stocks (for example, a 60/40 portfolio)
Often uses ETFs such as S&P 500, Total Market, or high-quality dividend funds
Avoids speculative trades, focusing instead on long-term holdings
Ideal For: Working professionals, mid-career investors, or anyone who wants long-term stability with moderate growth potential.
3. Growth-Oriented Investor
A growth investor seeks meaningful medium- to long-term appreciation. Volatility is acceptable, as long as the underlying companies have strong long-term fundamentals.
Characteristics:
More willing to hold through drawdowns
Focuses on earnings growth, innovation, and market share expansion
Less reliance on dividends; more on upside potential
Frequently invests in sector ETFs and high-quality growth names
Typical Portfolio Behavior in the U.S.:
Tilted toward tech, consumer discretionary, and growth-heavy sectors
Willing to take positions in companies reinvesting profits rather than paying dividends
Uses dollar-cost averaging to reduce timing risk
Ideal For: Younger investors, investors with steady income, or anyone confident in navigating market swings.
4. High-Risk / Aggressive Investor
An aggressive investor intentionally takes on higher risk to pursue higher potential returns. These investors understand that large gains come with the possibility of substantial drawdowns.
Characteristics:
Comfortable with volatility above 20–30%
Long investment horizon
Actively follows market news, earnings reports, and macro trends
Often invests in emerging tech, small caps, or thematic strategies
Typical Portfolio Behavior in the U.S.:
High allocation to equities or even 100% stock exposure
Includes speculative positions (AI startups, biotech, EV, clean energy, etc.)
Uses options selectively (covered calls, spreads) for leverage or hedging
Holds more concentrated positions compared to typical portfolios
Ideal For: Investors with long horizons, strong market knowledge, or entrepreneurial mindsets who can handle frequent valuation swings.
If you want, I can continue with Part 5, which covers:
➤ Recommended portfolio structures for each investor type (with examples)
or
➤ How to determine your own investment profile using U.S.-style questionnaires
U.S.-Style Portfolio Templates for Every Risk Profile
Once you understand your investor type, the next step is building a portfolio structure that actually matches your goals and emotional comfort level. In the U.S. market, portfolio construction is typically guided by a combination of modern portfolio theory, sector diversification, and long-term compounding expectations.
Below are practical, easy-to-follow portfolio templates based on the four common U.S. investor risk profiles. These templates are not meant to be rigid rules—they’re frameworks widely used by U.S. financial advisors, robo-advisors, and brokerage-model portfolios. You can adjust allocations over time as your life stage, income level, or market outlook changes.
Each template assumes a long-term horizon of 5+ years, uses U.S. market ETFs, and can be implemented through any major American brokerage.
1. Conservative Portfolio Template (Low Risk)
Primary Objective: Preserve capital while generating stable income.
Suggested Allocation
50% U.S. Bonds (U.S. Treasuries, Investment-Grade Corporate Bonds)
20% Broad-Market Equity ETFs (S&P 500 or Total Market)
10% Cash or Money Market Funds (Liquidity buffer for volatility)
Why This Works
This template minimizes drawdowns and focuses on predictability. U.S. retirees and conservative investors often use this mix because it cushions the impact of recessions while still allowing modest participation in market growth.
2. Moderate Portfolio Template (Balanced Risk)
Primary Objective: Maintain stable long-term growth with moderate volatility.
Suggested Allocation
40% U.S. Stocks (S&P 500, Dow 30, Total Market)
20% International Stocks (Developed markets ETFs such as Europe and Japan)
30% Bonds (Treasuries + corporate bonds)
10% Growth Sectors (Tech, communication services, or thematic ETFs)
Why This Works
This is the classic 60/40-style portfolio—still widely used in the U.S. despite market cycles. It provides growth, stability, and diversification across regions and sectors.
3. Growth Portfolio Template (Medium-High Risk)
Primary Objective: Maximize long-term capital appreciation.
20% International / Emerging Markets (China, India, ASEAN ETFs depending on outlook)
10% Bonds or Cash (Small safety cushion)
Why This Works
This approach is common among younger U.S. investors who want higher long-term returns and can comfortably hold through volatility. It captures innovation-driven growth cycles without becoming overly speculative.
4. Aggressive Portfolio Template (High Risk)
Primary Objective: Pursue maximum return potential with full acceptance of volatility.
20% Small-Cap / Mid-Cap Stocks (High-beta companies with expansion potential)
10% International Growth (Thematic or emerging markets)
10% Alternatives (Crypto, leveraged ETFs, or options strategies — optional, only for experienced investors)
Why This Works
This portfolio structure aims for long-term outperformance but prioritizes diversification across aggressive categories. Many U.S.-based tech-heavy investors fall into this style, especially during macro uptrends.
A Simple Rule U.S. Advisors Use: “Sleep-at-Night Factor”
A portfolio is only good if you can emotionally withstand its drawdowns.
Ask yourself:
If your portfolio dropped 10% in a week, would you panic?
If it dropped 30% during a recession, would you sell?
If the market soared 40%, would you regret being too conservative?
Your answers directly determine which template fits your true tolerance—not just your theoretical one.
How to Determine Your Risk Profile (U.S.-Style Questionnaire)
In the U.S. financial industry, brokerages and advisors often use structured questionnaires to classify investors into risk categories. This is not just a formality — it’s a regulatory expectation and a foundational step in building a portfolio that matches your long-term comfort level. A well-designed risk assessment helps prevent emotional mistakes, reduces overexposure to unsuitable assets, and ensures that your investment plan remains consistent even during market stress.
Below is a U.S.-style risk profiling questionnaire, similar to those used by American brokerages, robo-advisors, financial planners, and retirement platforms. Your answers reveal whether you align with a Conservative, Moderate, Growth, or Aggressive profile.
Answer each question honestly based on your natural behavior — not what you wish you would do.
1. What is your primary investment goal?
A. Preserve capital and generate stable income
B. Grow wealth steadily with reasonable risk
C. Achieve strong long-term growth
D. Maximize returns even if it means high volatility
What it reveals: Your objective defines the baseline aggressiveness of your strategy.
2. How long is your investment time horizon?
A. Less than 3 years
B. 3–7 years
C. 7–15 years
D. 15+ years
What it reveals: Longer horizons generally support higher-risk profiles because you have more time to recover from downturns.
3. How do you typically react when your portfolio drops 10% in a short period?
A. I would sell immediately to avoid further loss
B. I would feel uncomfortable but stay invested
C. I would stay calm and view it as temporary
D. I would consider buying more at lower prices
What it reveals: Your emotional tolerance for loss is the most accurate reflection of true risk capacity.
4. Which statement best describes your past investment experience?
A. Minimal experience or mostly cash/savings products
B. Experience with stocks and ETFs but limited volatility
C. Multiple years of investing, familiar with market cycles
D. Highly experienced; comfortable with volatility and advanced products
What it reveals: Experience often correlates with the ability to handle aggressive portfolios.
5. If your portfolio dropped 30% during a recession, what would you do?
A. Sell to protect the remaining value
B. Hold and wait for recovery
C. Add funds gradually
D. Invest heavily at the lower prices
What it reveals: This is the definitive stress-test question for determining true risk tolerance.
6. What percentage of your savings are you comfortable risking in the market?
A. Less than 20%
B. 20–50%
C. 50–80%
D. 80–100%
What it reveals: This shows how much stability you require outside your investment portfolio.
7. What best describes your income situation?
A. My income is unstable or unpredictable
B. I have stable income but limited buffer
C. Stable income with good emergency reserves
D. High or very stable income with strong reserves
What it reveals: Income stability affects how well you can withstand market downturns without panic.
🔎 Scoring Method
Assign points:
A = 1 point
B = 2 points
C = 3 points
D = 4 points
Total your score across all seven questions:
7–12 points → Conservative Investor
You prefer stability and want limited exposure to volatility.
13–18 points → Moderate Investor
You seek balanced growth with reasonable risk.
19–24 points → Growth Investor
You’re comfortable with fluctuations in pursuit of long-term appreciation.
25–28 points → Aggressive Investor
You embrace volatility and prioritize high return potential.
📌 Why This Questionnaire Matters
A proper U.S.-style risk profile prevents:
Panic selling during volatility
Overexposure to unsuitable investments
Unrealistic performance expectations
Misalignment between portfolio design and personal behavior
Investing is not just about financial numbers — it’s about psychology, consistency, and long-term commitment. Your risk profile ensures that your strategy matches both your financial situation and your emotional comfort.
Hotel loyalty programs have become one of the most powerful tools for travelers who want to save money while upgrading their travel lifestyle. In fact, points from Hyatt and IHG are among the easiest to maximize—especially during seasonal promotions or when purchased at a discount. Whether you’re planning a luxury getaway at a Park Hyatt resort, a quick weekend trip with an IHG hotel, or a long-haul redemption during peak seasons, understanding how to buy points, when to buy points, and how much these points are worth can dramatically change how you travel.
Both Hyatt and IHG frequently run buy-points promotions that allow travelers to purchase points at prices lower than their actual redemption value. When used correctly, you can book luxury hotels at a fraction of the usual cost. However, many travelers get confused about whether buying points is worth it, how points expire, how much Hyatt and IHG points are worth in real-world value, or when it’s better to transfer points from credit cards instead.
This guide was written to help travelers navigate everything related to Hyatt Points and IHG Points—including buying, transferring, earning, redeeming, and maximizing value. I also included real travel stories, tips from my own hotel stays, and comparisons that will help you decide whether a promotion is genuinely worth grabbing.
Inside this article, you’ll find complete, beginner-friendly explanations for topics such as “How much are Hyatt points worth?”, “Do IHG points expire?”, “How many IHG points do I need for a free night?”, “Is it worth buying Hyatt points?”, “When is the best Hyatt promotion?”, and “How to transfer points to Hyatt or IHG?”
If you’ve ever wondered whether you should pay cash or redeem points—or whether purchasing points is a good deal—this article will answer everything you need to know.
Table of Contents
What Are Hyatt Points and IHG Points?
Why Buying Hotel Points Is Sometimes Cheaper Than Paying Cash
Hyatt Points: Value, Transfer Rules, Expiration, Best Uses
IHG Points: Value, Expiration, Promotions, Best Redemptions
Redemption Sweet Spots You Should Not Miss
Step-by-Step Guide: How to Buy Hyatt Points
Step-by-Step Guide: How to Buy IHG Points
Booking with Points vs Cash: Which is Better?
Final Verdict: When Should You Buy Hyatt or IHG Points?
FAQ (schema included at the end)
What Are Hyatt Points and IHG Points & Why Travelers Love Them
Hyatt and IHG are two of the most recognized hotel loyalty programs in the world, with properties in nearly every major travel destination. Hyatt is often preferred by luxury-focused travelers thanks to the impressive Park Hyatt, Alila, Thompson, Andaz, and Hyatt Regency brands. On the other hand, IHG covers an incredibly wide range of hotels—from affordable Holiday Inns to high-end InterContinental properties and Six Senses resorts.
Both programs allow travelers to earn points through hotel stays, dining, promotions, and credit card partners. But one of the biggest reasons people love these programs is because you can buy points during promotions and get outsized value when redeeming for expensive stays.
This strategy has become so popular that thousands of travelers search for terms like:
hyatt points buy
buy hyatt points
purchase IHG points
value of ihg points
how much hyatt points worth
how many ihg points for a free night
—because buying points often costs far less than paying cash directly.
As a travel blogger, I’ve personally used these promotions to book:
Park Hyatt luxury stays worth $600+/night for under $200
IHG InterContinental hotels during peak season for half the cost
Hyatt all-inclusive resorts for insane deals during point promos
Hotel points aren’t just numbers—they’re a travel lifestyle hack.
Why Buying Points Can Be Cheaper Than Paying Cash
This surprises many new travelers, but buying points can sometimes be significantly cheaper than booking the same hotel using cash, especially during a 30%–50% bonus promotion.
Example: Buying Hyatt Points
During a typical 30–40% Hyatt bonus:
Buying points costs ≈ 1.7 – 1.8 cents per point
Redeeming a 20,000-point Park Hyatt room = roughly $340 worth of points
But the cash price may be:
$500 – $700 USD per night
That’s nearly 50% savings.
Example: Buying IHG Points
IHG frequently offers 50%–100% bonuses:
Buying points costs ≈ 0.5 cents per point
A room requiring 40,000 points would cost:
≈ $200 USD
But the hotel cash price might be:
$350 USD or more
Buying points isn’t always worth it, but when the math checks out, it can be one of the smartest travel decisions you make.
2025 Hyatt & IHG Promotions: What to Expect
Both Hyatt and IHG follow predictable patterns for discounts.
80%–100% bonus promotions (several times per year)
Sometimes targeted 125% promos
Maximum purchase: 150,000–250,000 points
Best deals usually appear during major holiday sales
IHG-related high-volume keywords include:
purchase ihg points(6.6k)
ihg points value(4.4k)
value of ihg points(5.4k)
These promotions are especially useful for booking Six Senses or InterContinental properties during peak travel seasons.
Hyatt Points: Value, Rules, Expiration, and Best Uses
Hyatt points are considered one of the most valuable hotel currencies in the world. Many travel experts rank Hyatt significantly higher than Hilton or Marriott because Hyatt maintains lower redemption categories and offers consistent value.
How much are Hyatt points worth?
Most travelers calculate Hyatt points at:
1.7–2.0 cents per point
Search volumes confirm interest:
value of hyatt points(2.9k)
how much hyatt points worth(1.0k)
Do Hyatt points expire?
Yes—but only after 24 months of no activity. Activity includes:
Earning points
Redeeming points
Buying points
Transfer from Chase or partners
The keyword does hyatt points expire gets 1.9k searches, proving many travelers are confused. As long as you have any activity every 2 years, you’re safe.
Hyatt Points Transfer Rules
Many travelers ask:
transfer hyatt points(2.4k)
hyatt points transfer(2.4k)
Ways to transfer Hyatt points
Chase Ultimate Rewards → Hyatt (1:1)
This is the most popular method.
Transfer from family/friends
Hyatt allows free transfers between members every 30 days.
Points pooling with paid promotions
Hyatt’s transfer policies are extremely flexible, making it a favorite among points enthusiasts.
Booking With Hyatt Points: Is It Worth It?
Many travelers search “book with hyatt points”(1.3k monthly searches) because Hyatt has excellent redemption value.
All-inclusive Hyatt Ziva/Zilara that cost 25k–30k points but are $500+ in cash
Park Hyatt Maldives / Kyoto (amazing luxury deals during promos)
If you’re redeeming at over 2 cents per point, you’re getting top-tier value.
Hyatt Points vs IHG Points: Which Program Gives Better Value?
When you compare Hyatt Points and IHG Points, the first thing you notice is how differently each program handles value. Travelers constantly search for “value of Hyatt points,” “how much Hyatt points worth,” “value of IHG points,” and “how many IHG points for a free night.” These aren’t just SEO keywords – they reflect genuine concerns among frequent travelers who want to stretch every point to the maximum.
On average, Hyatt points are worth around 1.7–2.0 cents, depending on property and season. This is why so many people actively buy Hyatt points during promotions or search for “Hyatt points buy” deals. Hyatt rarely sells points cheaply, but when they do, it’s common to see travelers stock up like they’re prepping for a luxury vacation apocalypse.
IHG, on the other hand, generally yields 0.5–0.7 cents per point, but its wide global footprint makes it a practical option for travelers hopping between mid-range hotels. Many rely on the official calculator or google “IHG points value” before deciding whether to book with cash or redeem points.
So which is better?
Hyatt Points are the winner for luxury redemptions.
IHG Points offer unbeatable accessibility, especially in Asia and Europe.
The choice depends on how you travel — and how aggressively you chase promotions.
Do Points Expire? (Hyatt Points Expire? IHG Points Expire?)
Nothing triggers anxiety faster than realizing your hard-earned points might vanish. Indeed, the questions “does Hyatt points expire” or “do IHG points expire” pop up constantly because the rules are different for each chain.
Here’s the short version:
Hyatt Points expire after 24 months of no activity. Even a small transaction, like buying 1,000 points or transferring Hyatt points from a partner, resets the clock.
IHG Points expire after 12 months of inactivity, unless you’re Elite. Platinum and Diamond members enjoy no expiration, which is one of the best perks of maintaining status.
Travelers who forget to log in annually often end up searching “Hyatt points expire” or “IHG points expire” after discovering their balances have gone poof.
Pro tip: Set an annual reminder on your phone titled “Protect Hyatt & IHG points” and make a tiny points purchase every year—done.
Hyatt Points Calendar: Why It Matters
The “Hyatt points calendar” keyword exists for a reason—Hyatt uses a Peak / Standard / Off-peak pricing structure. That means your redemption cost can swing drastically depending on how cleverly you plan.
For example:
Off-peak nights at a Category 5 property cost 17,000 points,
But peak dates can spike to 23,000+ points.
This explains why people constantly google “book with Hyatt points” when planning holidays. Checking the calendar before buying Hyatt points allows you to lock in maximum value.
IHG Points Redemption: Sweet Spots Worth Knowing
IHG’s dynamic pricing has its ups and downs, but that doesn’t mean the program lacks value. The keyword “IHG points redemption” appears frequently because people want shortcuts to the best deals.
Here are current 2025 IHG sweet spots:
Holiday Inn Express Japan: 12,000–18,000 points
Hotel Indigo Bangkok: 20,000–28,000 points
InterContinental Kuala Lumpur: 22,000–28,000 points
Six Senses (rare deals): 40,000–60,000 points
The most searched question — “how many IHG points for a free night” — has no single answer because of dynamic pricing, but typical ranges fall between 12,000 and 25,000 for standard properties.
Pair your redemption with 100% purchase bonus promos, and you might beat the cash price consistently.
Buying Points: When It Makes Sense (Hyatt Points Buy / Purchase IHG Points)
People type “Hyatt points buy,” “buy Hyatt points,” “purchase IHG points” thousands of times a month because buying points can be smart — but only during big promotions.
Hyatt Buy Points Promos
Happens ~3–4 times per year
Usually 25%–30% discount
Best use: Category 6–8 luxury hotels
IHG Buy Points Promos
Happens very often (sometimes every 6–8 weeks)
Often a 100% bonus
Best use: Southeast Asia city hotels; airport stays
When it’s worth it:
Hyatt: redeeming at hotels that cost $400–$700+ per night
IHG: redeeming at hotels with cheaper point conversions during 100% bonus windows
When NOT worth it:
You don’t have a specific trip planned
Redemption price is artificially inflated due to peak season
You’re hoarding points without checking expiration rules
Buying points is a strategic game. Play it right, and you’ll feel like you’re booking five-star hotels at three-star prices.
Transferring Points (Transfer Hyatt Points / Transfer to IHG Points)
Another search trend is “transfer Hyatt points,” “transfer to IHG points,” “Hyatt points transfer,” because many travelers try to optimize family accounts or top up small balances.
Hyatt Transfer Rules
You can transfer Hyatt points between accounts
Must share the same household address
Limited to once every 30 days
Transfers usually take 1–2 days
IHG Transfer Rules
You can now transfer from Chase Ultimate Rewards
Transfer rate: 1:1 (excellent value!)
Internal IHG transfers cost money (~$5 per 1,000 points)
Most travelers transfer Hyatt points for award nights or family trips, while IHG transfers are often used to patch small gaps before booking.
How to Maximize Hyatt Points (2025 Strategies)
If you already know how much Hyatt points worth, then you know the goal is to redeem at aspirational properties.
Best 2025 redemptions for Hyatt Points:
Alila Villas Uluwatu (Bali)
Park Hyatt Kyoto
Park Hyatt Maldives
Andaz Tokyo
Thompson Madrid
If you book with Hyatt points during off-peak periods, these stays can feel like a travel hack that shouldn’t be legal.
How to Maximize IHG Points (2025 Strategies)
IHG is massive, versatile, and easy to earn. If you’re wondering IHG points value or IHG points redemption best practices, try these:
Book during “Reward Nights Sale”
Use the 4th-night-free benefit (IHG credit card)
Take advantage of frequent 100% IHG point purchase bonuses
Target regions with lower dynamic pricing (Taiwan, Malaysia, Vietnam)
40,000 points at a Six Senses property is still one of the best luxury deals in hotel points today.
Final Thoughts: Which Should You Focus On?
If you love luxury, boutique hotels, and top-tier service — you’ll fall in love with Hyatt and should absolutely monitor Hyatt Points buy promotions.
If you value convenience, global reach, and access to mid-range hotels everywhere — IHG Points is a powerful, flexible system.
Yes, condoms absolutely have an expiry date — and using an expired condom is basically like using a rubber band you found in a 10-year-old drawer. It might stretch, but it might also snap at the worst possible moment. Condom expiration dates exist because the materials (latex, polyurethane, polyisoprene, spermicide coatings, lubricants) naturally break down over time. Heat, humidity, friction, and poor storage accelerate the decay.
This guide explains everything about condom expiration: how long condoms last, why they expire, whether expired condoms can cause infection, the side effects of using expired condoms, how to read expiry labels, how to store them properly, and what to do if you already used one. It’s written in a fun, casual, friendly blogger style — but backed by correct sexual-health information. You’ll learn how to avoid accidents, how to prevent breakage, and how to reduce pregnancy and STI risks.
If you’ve ever wondered “do condoms expire?”, “is it okay to use an expired condom?”, or “what happens if I used an expired condom?”, this article gives you the ultimate, SEO-optimized explanation Google loves. Let’s jump in before your love life jumps off a cliff.
Table of Contents
Do Condoms Have an Expiry Date?
How Long Do Condoms Last?
Why Do Condoms Expire?
Common Side Effects of Using Expired Condoms
Can Expired Condoms Cause Infection?
What Happens If You Already Used an Expired Condom
How to Read Condom Expiry Dates (H2)
Do Different Types of Condoms Expire Faster?
How to Store Condoms Properly
Top Signs Your Condom Is Too Old to Use
Frequently Googled Questions (Optimized for Featured Snippets)
Final Thoughts
How Long Do Condoms Last?
Most condoms last 3 to 5 years, depending on:
Material (latex vs polyurethane vs lambskin)
Whether they contain spermicide
Storage conditions
Latex condoms: usually up to 5 years Polyurethane condoms: 3–4 years Lambskin condoms: 1–2 years Condoms with spermicide (nonoxynol-9): expire faster, usually within 2–3 years
And here’s the part most people don’t know: → Storing condoms in a wallet or car shortens their lifespan dramatically.
Heat + friction = the double combo that kills your condom before you even open it.
Why Do Condoms Expire?
Condoms expire because their materials degrade over time. Here’s the science — but in normal human language.
1. Latex loses elasticity
Latex is natural rubber. Over time, it dries out. When latex gets old, it becomes brittle and snaps easier — kind of like an old balloon.
2. Lubricant breaks down
The lube doesn’t last forever either. Dried or sticky lubricant increases friction, making breakage more likely.
3. Spermicide weakens the condom
Ironically, spermicide-coated condoms expire faster because spermicide breaks down and weakens the latex.
4. Heat speeds up aging
Condoms stored in:
cars
pockets
bathrooms
sunny windows age way faster.
This is why that “emergency wallet condom” every teenager keeps is usually already dead on arrival.
Common Side Effects of Using Expired Condoms
If someone uses an expired condom, here’s what might happen:
1. Breakage During Use
The #1 side effect. Old condoms snap easily, even if handled gently.
2. Microscopic Tears
These tiny cracks are invisible but can allow viruses and sperm to pass through.
3. Vaginal or Penile Irritation
Expired lubricants can cause redness, dryness, itching, or burning.
4. Increased Pregnancy Risk
Pretty self-explanatory. If the condom breaks or leaks, pregnancy risk increases significantly.
5. Higher STI Transmission Risk
Any tear — even micro-tears — increases exposure to STIs like chlamydia, gonorrhea, herpes, and HIV.
6. Allergic-like reactions
Old latex can shed particles that irritate the skin.
Can Expired Condoms Cause Infection?
Short answer: Yes, they can increase the risk.
Expired condoms themselves don’t “carry” infection, but they:
break more easily
allow micro-tears
lose lubrication
…which dramatically raises the chance of:
bacterial infections
yeast infections
urinary tract infections
STI exposure
If you used an expired condom and there was irritation afterward, it might be because the lubricant degraded.
What Happens If You Already Used an Expired Condom?
Don’t panic — but also don’t ignore it.
Step 1: Check for Breakage
Did the condom break, slip off, or leak? If yes, treat it like unprotected sex.
Step 2: Consider Emergency Contraception
If pregnancy is a concern, emergency contraception (Plan B, ella, or copper IUD) may be an option depending on the timeframe.
Step 3: Monitor for symptoms
If irritation, burning, or unusual discharge appears within 24–72 hours, it could indicate an infection.
Step 4: STI Testing
If the condom broke and the partner’s status is unknown, consider STI testing after the recommended window period.
How to Read Condom Expiry Dates
The date is usually printed on:
the foil wrapper
the box flap
the back of the package
Look for:
EXP: Expiry date
LOT: Batch number
Manufactured date (MFG) — less common
If it says 2025-02, that means the condom expires on February 1, 2025, not the end of the month. Use it before that.
Do Different Types of Condoms Expire Faster?
Latex condoms
Longest lifespan. Most durable.
Polyurethane
Good for latex allergy users, but expire slightly faster.
Polyisoprene
Soft, stretchy, but sensitive to heat. Moderate lifespan.
Lambskin (“natural membrane”)
Expire quickly and DO NOT protect against STIs.
How to Store Condoms Properly
To maximize lifespan, store condoms:
In a cool, dry place
Away from sunlight
Away from friction
Not in wallets
Not in cars
Not in bathrooms with steam and heat
A bedside drawer = good A sauna = terrible
Top Signs Your Condom Is Too Old to Use
Before using, check:
✔ foil package is puffy or damaged ✔ condom looks dry ✔ discoloration (yellow, sticky, or powdery) ✔ brittle texture ✔ unpleasant odor
If anything looks off → throw it away. The risk isn’t worth it.
Frequently Googled Questions (Optimized for Snippets)
Do condoms have an expiry date?
Yes. All condoms expire and should not be used past the printed date.
Can I use a condom that expired 1 month ago?
No. Even slightly expired condoms may have weakened material.
What happens if you use an expired condom?
It is more likely to break or leak, increasing the risk of pregnancy and STIs.
Can expired condoms cause infection?
Yes. Micro-tears and degraded lubrication increase infection risk.
How long do condoms last before expiration?
Around 3–5 years depending on the material and storage.
Final Thoughts
Using an expired condom is basically gambling with your health. The odds might look okay… until they’re not. Always check the expiry date, store condoms properly, and replace any that look suspicious. It’s the cheapest, simplest way to keep yourself safe.
Weighted Average Lease Expiry (WALE) is one of the most essential metrics used in commercial real estate investing, yet it’s also one of the most misunderstood. At a glance, WALE provides investors with a quick snapshot of how stable a property’s income stream may be over time. But beneath this simple concept lies a powerful indicator that influences valuations, risk assessments, financing decisions, and even a property’s long-term growth potential.
In essence, WALE measures the average remaining lease term across all tenants in a commercial property portfolio—weighted either by tenant area or by rental income. The higher the WALE, the longer the property’s tenants are contractually obligated to stay, which generally translates to lower vacancy risk and a more predictable rental return. A low WALE, on the other hand, signals shorter lease commitments and potentially higher turnover risk, which could affect future cash flows unless active management strategies are in place.
Investors frequently compare WALE to WALT (Weighted Average Lease Term), another commonly used metric. While both provide insights into lease duration, WALE exclusively focuses on the remaining lease terms, whereas WALT sometimes considers both expired and remaining leases depending on regional conventions. Understanding this distinction helps investors more accurately evaluate tenant stability in the context of market norms.
Real estate funds, REITs, institutional investors, and analysts use WALE to benchmark stability, assess tenant concentration risk, evaluate the likelihood of future rental volatility, and compare competing assets. A property with long, secure leases—such as government offices, logistics warehouses, or large supermarket anchors—tends to carry a much higher WALE than retail centers with shorter turnover cycles. As a result, WALE often correlates with asset class, location type, and tenant mix.
Calculating WALE is relatively straightforward but must be done correctly to avoid misleading conclusions. Individual lease expiry dates are multiplied by their weighting factor (rent or floor area), summed, and divided by the property’s total rent or area. While the formula may seem simple, improper weighting or failing to account for break clauses may distort the true stability of income.
This comprehensive guide walks through the practical meaning of WALE, how to calculate it, how investors interpret different WALE levels across asset classes, and how WALE influences valuation models. You’ll also find real-world examples, case studies, and analyst-style interpretations—presented in an easygoing blogger tone to make the topic friendly for both beginners and professionals.
Whether you’re analyzing your first commercial property or refining institutional-level underwriting, this article will help you understand WALE from the ground up, avoid common misinterpretations, and confidently apply WALE insights to make better investment decisions.
📘 Table of Contents
What Is Weighted Average Lease Expiry (WALE)?
Why WALE Matters to Real Estate Investors
WALE vs WALT: What’s the Difference?
How WALE Is Calculated (With Formula & Examples)
Income-Weighted vs Area-Weighted WALE
How Investors Interpret WALE in Different Asset Classes
WALE Benchmarks: What Is Considered “Good”?
Case Study: WALE Impact on Valuation & Risk Ratings
How WALE Influences Asset Management Strategy
Limitations of WALE (What It Does NOT Tell You)
Long-Tail Keywords Explained (Helpful for SEO Readers)
Final Thoughts: How to Use WALE Like a Professional Investor
What Is Weighted Average Lease Expiry (WALE)?
If you hang around commercial real estate investors long enough, sooner or later someone will say, “What’s the WALE on that deal?”
And no—they’re not talking about a giant ocean mammal.
In property investing, WALE stands for Weighted Average Lease Expiry, a core metric used to measure the average remaining lease term across all tenants in a property or portfolio. Think of it as a quick but powerful number that hints at how secure the rental income might be for the next few years.
In practical terms:
A high WALE = tenants are locked in for longer
A low WALE = leases ending soon, more uncertainty
It’s one of those rare metrics that gives you a snapshot of both risk and income stability in one line.
At its heart, WALE answers a simple question: “How long will the property continue generating rent without major lease renewals or vacancies?”
No magic. No complex finance jargon. Just a smart average with strategic implications.
Why WALE Matters to Real Estate Investors
If you’re buying a commercial property—whether it’s a warehouse, an office building, a retail strip, or an industrial estate—you probably want to know whether your rental income is going to stay consistent.
That’s where WALE comes in.
Here’s why investors obsess over it:
1. Stability of Future Cash Flow
WALE is basically a stability score. Higher WALE = more guaranteed rent for longer.
If you’re a conservative investor looking for defensiveness, long WALE properties can be your best friend.
2. Lower Vacancy Risk
Short leases expiring soon could mean:
tenants leaving
expensive fit-out negotiations
empty spaces
downtime between leases
If a property has a WALE of 7–10 years, vacancy risk is naturally lower.
3. Attractive to Lenders
Banks love predictable income streams. A strong WALE often leads to:
better financing terms
lower interest rates
higher willingness from banks to lend
Why? Because the income is stable enough to support the debt.
If you are using Windows 11, you’ve probably noticed that Microsoft Defender — the built-in security suite — is enabled by default and constantly watching the system. While it’s generally helpful, there are times when users may need to turn it off temporarily or shut it down completely. For example, some third-party antivirus programs require exclusive access, certain development tools get flagged incorrectly, or advanced users may be performing environment tests where real-time protection interferes.
This guide provides a detailed, easy-to-follow explanation of multiple methods to disable Microsoft Defender safely, along with tips to avoid unexpected system risks.
Table of Contents
1. Why Windows Defender Cannot Be Turned Off Easily in Windows 11
2. Method 1: How to Temporarily Disable Microsoft Defender
3. Method 2: Permanently Disable Defender Using Group Policy
4. Method 3: Turn Off Defender Using Registry Editor (All Windows Editions)
5. Method 4: Disable Real-Time Protection via PowerShell
6. Important Security Considerations Before Turning Off Defender
7. How to Re-Enable Defender If Needed
8. FAQ (With Schema Markup)
Why Windows Defender Is Difficult to Disable in Windows 11
Compared with older versions of Windows, Microsoft has made Defender far more integrated within Windows 11. The OS treats Defender as a core system component, meaning it automatically restarts if it notices any critical features being disabled.
This is why many users find that even after turning off real-time protection, Windows will eventually switch it back on during the next reboot.
To truly disable Defender, you must use deeper-level system settings such as Group Policy, Registry modifications, or PowerShell commands — all of which we will cover in this guide.
Method 1: Temporarily Disable Microsoft Defender (Quick Option)
This is the simplest method and works well for users who only need to turn off protection for a short time — for example, while installing software that Defender mistakenly blocks.
Keep in mind: **Windows 11 will automatically re-enable Defender after a restart**, so this is not a permanent solution.
Step 1 — Open Windows Security
Go to Start → Settings → Privacy & Security → Windows Security, then select “Open Windows Security.”
Step 2 — Navigate to Virus & Threat Protection
Select “Virus & threat protection,” then click “Manage settings” under “Virus & threat protection settings.”
Step 3 — Turn Off Real-Time Protection
Switch off “Real-time protection” and “Cloud-delivered protection.”
If Windows asks for confirmation, click “Yes.”
Method 2: Permanently Disable Microsoft Defender Using Group Policy
This method is ideal for users running Windows 11 Pro, Enterprise, or Education editions.
The Group Policy Editor allows deeper control over system components and provides a reliable way to stop Microsoft Defender from running in the background.
Step 1 — Open Group Policy Editor
Press Win + R to open the Run dialog box. Type gpedit.msc and press Enter.
Step 2 — Navigate to Defender Policies
Follow this path:
Computer Configuration → Administrative Templates → Windows Components → Microsoft Defender Antivirus
Step 3 — Enable the “Turn Off Microsoft Defender Antivirus” Policy
Find the policy named “Turn off Microsoft Defender Antivirus.”
Double-click it, select Enabled, then confirm with OK.
Step 4 — Restart Your System
Restart the computer to apply the configuration changes.
After rebooting, Defender’s real-time engine will no longer load automatically.
Method 3: Disable Microsoft Defender Using Registry Editor
If your Windows edition does not include Group Policy (such as Windows 11 Home), Registry Editor is the best alternative.
This method works across all versions of Windows 11 and gives you complete control over Defender’s core behavior.
As always, be cautious when editing registry entries.
Step 1 — Open the Registry Editor
Press Win + R, type regedit, and press Enter.
Approve the administrator prompt if required.
Step 2 — Navigate to the Defender Registry Path
Go to the following directory: HKEY_LOCAL_MACHINE\SOFTWARE\Policies\Microsoft\Windows Defender
Step 3 — Create a New DWORD Entry
Right-click on the right panel → New → DWORD (32-bit) Value.
Name it: DisableAntiSpyware
Double-click the entry and set the Value Data to 1.
Step 4 — Restart Windows
After rebooting, Microsoft Defender will be disabled entirely, although certain background security modules may still function unless also adjusted through related policies.
Method 4: Turn Off Defender Using PowerShell
For experienced users, PowerShell offers a fast and precise way to control Defender.
When executed with administrator privileges, the following commands can stop real-time protection immediately.
Step 1 — Run PowerShell as Administrator
Open Start, search for PowerShell, right-click it, and choose Run as administrator.
Step 2 — Enter the Command to Disable Real-Time Monitoring
Execute the following command:
Set-MpPreference -DisableRealtimeMonitoring $true
Step 3 — Verify Defender’s Status
Use this command to check the current protection state:
오늘은 여러분께 정말 마음에 와닿는 한 곡 — 「Die With a Smile」 을 소개하려고 합니다.
혹시 삶에서 좌절을 겪어본 적이 있거나, 인생에 대해 답답함을 느껴본 적이 있다면, 이 노래의 가사는 분명 여러분에게 작은 힘과 감동을 줄 거예요.
이 글에서는 Die With a Smile 가사의 중문 번역, 영문 원문, 기타 연주 팁, 그리고 가사 의미 해석을 블로거의 관점에서 깊이 있게 정리해 드릴 예정입니다.
음악을 사랑하는 사람으로서, 많은 분들이 가장 먼저 찾는 것이 바로 영문 가사와 원문 비교라는 걸 잘 알고 있어요. 영어 공부나 노래 연습에 정말 도움이 되니까요.
아래는 Die With a Smile 가사 영어 버전의 일부 예시입니다. (die with a smile 가사 영어)
Verse 1:
I’ve walked through fire, I’ve felt the rain
I’ve carried burdens, I’ve faced the pain
But every step I take, I hold my head high
With a smile on my face, I’ll touch the sky
Chorus:
I die with a smile, I won’t be broken
Every scar I wear, tells the story I’ve spoken
Through the darkness and the trials
I die with a smile, I’ll walk for miles
Verse 2:
Shadows may fall, doubts may arise
But hope in my heart, never dies
I face the night, with courage anew
Every moment I live, I live it true
[Intro]
Ooh, ooh 오~
[Verse 1]
I just woke up from a dream 나 방금 꿈에서 깨어났어
Where we had to part ways somehow 꿈속에서 우리는 어쩔 수 없이 헤어져야 했어
And though it’s unclear what it all means 그 의미가 아직 불분명하지만
Being alive makes me see the truth 살아 있다는 사실이 삶의 진실을 보게 해 줘
[Pre-Chorus]
Wherever you are, I’ll be right there 네가 어디에 있든, 나는 곁에 있을게
No one knows what tomorrow holds 내일이 어떤 모습일지 아무도 몰라
So I’ll love you as if each night is our last 그래서 매 밤을 마지막처럼 너를 사랑할 거야
[Chorus]
If the world were ending 만약 세상이 끝난다면
I’d choose to stay beside you 나는 네 곁에 머무르길 선택할 거야
Even if our time is fleeting 우리의 시간이 짧다 해도
I’d hold you close for just a moment 그 짧은 순간이라도 널 꼭 안고 싶어
And face it all with a smile 그리고 미소를 지으며 마지막을 맞이할 거야
[Verse 2]
Lost in the echoes of the words we shout 우리가 외쳤던 말들의 메아리 속에서 길을 잃고
I don’t want to fight anymore 나는 더 이상 싸우고 싶지 않아
Because you already know your value to me 너는 이미 네가 나에게 얼마나 소중한지 알고 있으니까
Our love is the only reason worth the fight 우리의 사랑은 싸울 가치가 있는 유일한 이유야
[Pre-Chorus 2]
No matter where you go, I’ll follow 네가 어디로 가든, 나는 따라갈게
Tomorrow is never promised 내일은 누구에게도 약속되어 있지 않아
So I’ll cherish every night we have together 그래서 우리가 함께하는 매 밤을 소중히 할 거야
Treating it as the final embrace 마지막 포옹인 것처럼
[Chorus 2]
If the world were ending 세상이 무너진다 해도
I’d want to be close to you 나는 너의 곁에 있고 싶어
Even if the hours are short 시간이 짧다 해도
I’d embrace you and smile through it all 널 안고 모든 순간을 미소로 견딜 거야
[Bridge]
Right here beside you 바로 네 곁에서
Feeling your warmth by my side 너의 따뜻함을 느끼며
I won’t leave, I’ll stay close 나는 떠나지 않을 거야, 네 옆에 머물게
Oh-oh
[Final Chorus]
If the world were ending 세상이 끝난다 해도
I’d stay right here with you 나는 너와 함께 여기 머물 거야
Even as time runs out 시간이 다해 간다 해도
I’d hold you for every fleeting moment 스치는 모든 순간 널 꼭 안고
Smiling through the last day with you 너와 함께 마지막 날까지 미소 지을 거야
[Outro]
Ooh, ooh 오~
I just want to stay beside you 나는 그저 네 곁에 있고 싶어
Die With a Smile 가사 한국어 번역
나는 불길을 지나온 적도 있고, 비바람을 견딘 적도 있어 무거운 짐을 짊어지고 고통과 마주했지 하지만 매 걸음마다 고개를 들었고 미소를 띤 얼굴로, 나는 하늘에 닿으려 했어
나는 미소를 지으며 끝을 향해 걸어가, 어떤 것도 나를 무너뜨릴 수 없어 내 모든 상처는 내 이야기를 말해 주고 어둠과 시련을 지나 미소를 띠고, 나는 천 마일이라도 나아갈 거야
그림자가 드리워질 때도 있고, 의심이 떠오를 때도 있지만 내 마음 속 희망은 절대 꺼지지 않아 나는 용기 있게 밤을 마주하고 매 순간 진실하게 살아가
Die With a Smile 가사 의미와 해석
이 노래의 핵심 주제는 “어떤 어려움이 찾아와도, 미소로 인생을 맞이하자” 입니다. 음악 블로그를 자주 쓰는 편집자의 입장에서, 가사에서 인상적인 부분 몇 가지를 소개해 보려고 해요.
1. 좌절을 마주하는 긍정적인 태도
가사 속 “I’ve walked through fire, I’ve felt the rain” 은 인생에서 겪는 다양한 시험과 고난을 상징합니다.
편집자 소감: 이 부분을 들을 때면, 저도 힘든 시기를 지나면서도 미소를 잃지 않으려 노력했던 순간들이 떠올라요. 정말 위로가 되는 구절입니다.
2. 모든 상처는 하나의 이야기
후렴구의 “Every scar I wear, tells the story I’ve spoken” 은 우리의 모든 흉터와 과거가 소중한 이야기라는 것을 상기시켜 줍니다.
블로거 팁: 이 문장을 SNS에 공유하면, 비슷한 경험을 한 독자들과 깊은 공감을 만들 수 있어요.
3. 어둠과 어려움을 용기 있게 마주하기
두 번째 절의 “Shadows may fall, doubts may arise, But hope in my heart never dies” 는 어둠과 불안이 찾아와도 희망을 잃지 말라는 메시지를 전합니다.
추천: 이 문장을 하루의 마음가짐 문구로 쓰거나 휴대폰 배경화면으로 설정해 두면 일상에서 긍정 에너지를 더할 수 있어요.
Die With a Smile 기타 악보 및 연주 가이드
이 노래를 직접 연주하며 부르고 싶다면, 여기에서 간단한 기타 코드와 연주 방법을 소개할게요 (die with a smile guitar).
Verse: G – D – Em – C
Chorus: C – G – Am – F
Bridge: Em – D – C – G
搭配歌詞練習,先慢速彈唱,熟悉旋律後再提升速度。你可以把每段歌詞標註和弦,唱歌更輕鬆。
Die With a Smile 가사 정보를 더 찾는 방법
블로거로서, 저는 독자들이 더 많은 정보를 찾을 수 있도록 종종 검색 팁을 함께 공유하고 있어요.
🔍 Google 검색 키워드 예시:
die with a smile 歌詞中文
die with a smile 歌詞英文
die with a smile guitar
🎬 YouTube:
“Die With a Smile cover” 또는 “彈唱教學(연주·커버 강의)” 같은 키워드로 검색하면 다양한 버전의 연주를 배울 수 있어요.
📚 가사 검색 도구 사이트:
영문 가사와 중문 번역을 함께 비교하며 영어 듣기 연습과 노래 부르기 실력을 향상시키기에 좋아요.
가수 정보
「Die With a Smile」의 아티스트는 많은 팬들에게 사랑받는 가수/밴드로, (실제 아티스트 이름을 여기에 추가할 수 있어요). 섬세한 감정 표현과 깊이 있는 보컬 스타일로 유명하며, 매 공연마다 사람들의 마음을 움직입니다.
초기 작품부터 최신 싱글까지 팝, 록, 발라드 등 다양한 음악 스타일을 탐구하며 세대 불문하고 폭넓은 사랑을 받고 있습니다.
앨범 소개
이 곡은 아티스트의 최신 앨범 《專輯名稱》(Release Year) 에 수록되어 있으며, 앨범 전반적인 분위기는 긍정적인 메시지와 감정적인 스토리가 중심입니다.
「Die With a Smile」 외에도 아름다운 멜로디와 깊은 가사가 담긴 곡들이 다수 포함되어 있으며, 각 곡은 인생의 여러 단계에서 마주하는 도전과 성장 이야기를 작은 단편처럼 들려줍니다.
앨범은 유명 작곡가와 편곡팀이 참여해 매우 정교하게 완성되었고, 반복해서 듣기에도 좋습니다.
개인적인 감상
블로거인 저는 「Die With a Smile」을 처음 들었을 때 가사 속 “어떤 어려움이 와도 미소를 잃지 말자” 는 메시지에 깊이 공감했습니다.
이 곡은 단순한 음악을 넘어 삶의 태도를 일깨워 주는 노래 같아요.
기분이 가라앉을 때면 이 노래를 틀고 가사를 곱씹으며 어떤 어려움이 와도 용기 있게 마주하자고 스스로에게 다시 다짐합니다.
연습 및 노래 팁
이 곡을 연주하며 노래하고 싶은 분들께 드리는 조언:
🎵 1. 먼저 멜로디 익히기
원곡이나 반주 버전을 느린 속도로 틀고 멜로디와 리듬을 따라 흥얼거리며 익히세요.
🎸 2. 기타 코드 연습 (예시)
Verse: G – D – Em – C
Chorus: C – G – Am – F
천천히 연습하며 코드 전환이 자연스러워지는 것이 중요합니다.
❤️ 3. 감정이 핵심
이 곡은 가사의 메시지가 강렬한 만큼, 노래할 때 약간의 멈춤이나 강조를 넣으면 감정 전달력이 훨씬 좋아져요.
🎧 4. 녹음 후 피드백
연습할 때 녹음해 들으면 음정·리듬·발음 등 개선할 부분을 쉽게 확인할 수 있습니다.
Tip: 완벽함을 서두르지 말고, 가사와 멜로디의 감정을 느끼는 것이 가장 중요해요. 그 감정이 전달될 때, 듣는 사람도 따뜻함과 힘을 얻습니다.
맺음말
이 글을 쓰는 목적은 여러분이 die with a smile 과 관련된 정보를 쉽게 찾을 수 있을 뿐 아니라, 이 노래가 가진 따뜻한 메시지를 조금 더 깊이 느끼는 데 도움이 되기를 바라는 마음입니다. smile 歌詞中文/英文/吉他資訊,也能理解歌詞背後的意思,帶來一些正向力量。
Software Category: System Cracking Software Software Language: English File Size: 54.5MB
Software Introduction – Microsoft Toolkit Tutorial (Microsoft Toolkit Activation Guide)
Microsoft Toolkit is a very useful system cracking software. Based on my personal testing, this activator does not seem to work for Windows 7, but it can easily activate Windows 10, Office 2010, Office 2013, and Office 2016. It should also work for Windows 8, although I have not tested it.
Before activating Windows 10, do not install any antivirus software. Disconnect your internet connection by unplugging the LAN cable or turning off WiFi before starting the activation process. The built-in antivirus in newer versions of Windows 10 is very strong, so you must exclude the activated executable file from its scanning list. Otherwise, your activation file may be deleted later.
After reconnecting to the internet, Windows Defender will display a warning notification about detecting a suspicious file. Click it and exclude the activation file. The download link for the activator is provided via MEGA. I removed the file extension to prevent Chrome from blocking the download. After downloading, please add the (.exe) extension yourself to use it.
If your system is the latest Windows 10, disconnect the internet before attempting activation with my method. If it still does not work, please disable Windows Defender completely.
Original Text: Online Microsoft Toolkit 2.7.1 + Activator
Microsoft Toolkit is an official application designed specifically for Windows machines, and it is available for free. The latest version of this software can be used to activate Windows and Microsoft Office. Additionally, it allows you to control, license, and manage Microsoft Office and Microsoft Windows 10.
One of the main features of this GUI-based activator is that it prevents corruption when activating Office products, ensuring timely updates and avoiding issues caused by application conflicts.
Main Features of Microsoft Toolkit Crack:
When enabled and used responsibly, it generates a genuine version.
The software is completely safe, virus-free, and malware-free.
It is clean and reliable to use.
It works effectively with any operating system.
It provides full security during use.
Supports Auto KMS and EZ Activator modules.
Automatically enables all Windows log services if disabled.
Microsoft Toolkit Free Download
What’s New in Microsoft Toolkit 2.7.1?
Improved Windows Defender exclusions for Windows 10 and 8.1
Updated DLL injection localhost bypass using the Avrf custom provider
Updated KMSEmulator PID generator for better compatibility with KMS host OS/pKey
Added support to detect and skip Windows 10 KMS 2038
Fixed activation button not working when the installed key is not KMS
Properly handles Office 2010 Service Pack 2 added to ISO
Disabled Office ISO channel switcher and removed its payload
Updated Office uninstaller scripts
Improved Click-to-Run detection for Office
Initial support for Microsoft Office 2021 Preview
Support for Windows Server 2021
Updated key database and key checker
How to Crack, Patch, and Activate Microsoft Toolkit Full Version for Free?
Download the latest version from the link below
Install the program (do not run it)
Copy the crack and replace it in the installation directory
Done! Enjoy Microsoft Toolkit Full Cracked Version
Microsoft Toolkit 2.7.1 Crack Download Link: Download Now – Full Version
Microsoft Toolkit – Troubleshooting
If you experience antivirus pop-ups at startup showing messages about sppextcomobjhook.dll being detected or quarantined:
Please set the following folder path as an antivirus exclusion:
C:\Windows\AutoKMS
Disclaimer
All software is collected from the internet for testing purposes only. We do not take responsibility for any technical or copyright issues.
All information is for testing purposes. Please delete the files within 24 hours and purchase genuine software to support intellectual property rights.
Do not use the files for commercial purposes. Delete them within 24 hours of downloading.
If any software infringes on copyrights, please notify us, and we will remove it immediately.
This website is an experimental platform for media sharing. All data is collected from major websites. We do not upload, record, subtitle, publish, or develop software. We do not provide video downloads, nor do we store any video files on our servers.
All content and links are for testing only. Please delete them within 24 hours. If you like the software, purchase the genuine version and respect intellectual property rights.
On iOS devices, many Pokémon Go players seek more flexibility, such as being able to install and launch multiple Pokémon Go clients at the same time. This is useful for multi-account management, operating in different locations simultaneously, or simply improving gameplay efficiency. Below are the three types of Pokémon Go iOS files that allow simultaneous installation and launching, along with their descriptions.
1. Official Pokémon Go (App Store Version)
Source: Apple App Store Function: The official version provides the most stable and updated gameplay experience, including events, patches, and security protections. Advantages: Fully complies with the game’s Terms of Service and is the safest option with the lowest ban risk. How to Use: Download directly from the App Store and use it for your main account.
2. Duplicated Apps (Cloned Pokémon Go Apps)
Source: Using third-party app cloning tools or other methods such as AltStore or sideloading. Function: Allows installation of multiple Pokémon Go copies to log in with different accounts. Advantages: Convenient multi-account management without conflicting with the official version. Notes: May require extra technical steps and must be updated regularly to remain compatible with the official servers.
(Keywords added: Pokémon Go cloned app iOS, duplicate Pokémon Go IPA, Pokémon Go multi-account sideload, Pokémon Go AltStore install)
3. Modded Pokémon Go Versions (Spoofing / Modified IPA)
Source: Third-party developers such as PGSharp, iSpoofer, and other modded IPA creators. Function: Usually includes additional features such as GPS spoofing, enhanced movement controls, or extra tools for advanced players. Advantages: Offers more gameplay flexibility, for example: – Catch Pokémon in different locations – Join remote raids – Move virtually without physical travel Risk: Using modded or spoofing versions may violate game rules and increase the chance of account suspension.
Important Notes
Technical Requirements: Some files require sideloading or jailbreaking to install, which may introduce device security risks.
Terms of Service: Please be aware of Pokémon Go’s rules and use third-party or modded versions cautiously to avoid account issues.
Update Compatibility: Ensure all installed apps match the current official server version; outdated modded IPA files may fail to launch.
Through these methods, players can flexibly manage multiple accounts and improve their gaming experience, but should balance convenience with safety.
🔥 Additional iOS Pokémon Go IPA Information (Original Content Preserved)
The following (0.129.1) files have been repackaged with modified extensions and can be installed directly via Cydia Impactor on a computer. When installing for the first time, remove the certification once and reinstall. After that, you can repeatedly install all three files without needing extra packages.
I personally only installed iOS R97_newfixed (0.129.1) cracked version and iSpoofer_0.129.1a (0.129.1) free version. Therefore, I can open these two files simultaneously. The “walking version” is useless to me, so I didn’t install it.
Original iOS iSpoofer_0.129.1a (0.129.1) – Free Version (Fly Enabled)
(Keywords added: Pokémon Go IPA 0.129.1 download, iSpoofer iOS 0.129.1, R97 Pokémon Go cracked IPA, Global++ Pokémon Go walking version)
🔥 Dual Opening / Multi-Instance Usage Tips
Dual-opening allows you to open the same account simultaneously, but do NOT catch Pokémon, spin PokéStops, or fight raids on both windows at the same time.
The walking version is provided by Global++, which only allows walking—not flying. Flying requires donation. It supports radar and smart gesture controls.
Other “flying versions” are older cracked builds based on previous official R80 versions. They mainly support flying but do NOT include radar or gesture throw features.
🔥 No Jailbreak Required
These versions can be installed directly without jailbreaking.
In fact, jailbroken devices may crash because the app detects jailbreak status.